顯示具有 LINUX-伺服器 標籤的文章。 顯示所有文章

自動備份在每個月的第一個工作日(不包含週六及週日)

舊文章:
定期自動備份伺服器資料(前篇)
伺服器-rsync 異地備援(後篇)
定期自動備份伺服器資料(前篇)

為了備份網頁伺服器的資料(含資料庫),當時在crontab設定每個月的1號早上6點備份到NAS,但執行一段時間後發現了2個問題。
  1. NAS週末關機,如果1號剛好是週六或週日的早上6點,就會備份失敗。
  2. crontab原設定無法辨每個月的1號是不是週六或週日,如以下範例,2013年9月1日剛好就是星期日
  3. 0 6 1 * * /root/mysql-backup.sh

解決方法就是改寫crontab,讓系統在每個月第一個工作日(不包含週六或週日)執行備份。


方法一


以下寫法的意思為第一週(1日~7日)的星期一執行備份看起來好像是對的,但day of month和day of week是OR邏輯概念,也就是1日~7日都會執行之外,每週一還會再執行1次,所以這個方法就沒必要再研究下去。

0 6 1-7 * 1 /root/mysql-backup.sh
# man 5 crontab
Note:
The day of a command’s execution can be specified by two fields —
day of month, and day of week. If both fields are restricted (ie, aren’t *),
the command will be run when either field matches the current time.

For example, "30 4 1,15 * 5" would cause a command to be run at 4:30 am on the 1st and 15th of each month, plus every Friday.


方法二:正解


第一個工作日在排除週六與週日後,會隨機的落在週一至週五,而且不一定是每個月的1號(由前圖可以2013年8月的第一個工作日為8月1日週四,2013年8月的第一個工作日為9月2日週一,2013年10月的第一個工作日為10月1日週二)。

如何取出每個月的第一個工作日,並設定在crontab內?以2013年9月為範例。
  1. 使用cal指令列出當月行事曆,並且使用awk指令抓出行事曆行數(NR)及各行總欄位數(NF),NR及NF會做為判斷式的值。
  2. # cal -m   //參數m:Display Monday as the first day of the week.
    # cal -m | awk '{print $0 "\t NR:" NR "\t NF:" NF}   //可得知目前行事曆有8行(NR),每行最多7個欄位數(NF)。


  3. 取出9月份行事曆中3天以上的週數:取3天的意義為,若有2天為週六及週日,那剩下的必為週五或週一。
  4. # cal -m | awk '{if(NF>=3)print $0}' | grep '[0-9]'

  5. 取出9月份第一個工作日為9月2日。
  6. # cal -m | awk '{if(NF>=3)print $1}' | grep '[0-9]'| head -n 1

  7. 修正crontab後,記得要重啟crond服務。
  8. # crontab -e
      0 6 1,2,3 * * [ `/bin/date +\%d` -eq `cal -m | awk '{if(NF>=3)print $1}' | grep '[0-9]' | head -n 1` ] && /bin/sh /root//mysql-backup.sh  //&&的意思為,若前面的條件成立則執行後面的指令
    # service crond stop
    # service crond start

  9. 從此以後備份的工作都在每個月的第一個工作日,修正了週末備份失敗的問題。

DNS伺服器-正向及反向解析設定

DNS查詢只會使用53/UDP,除非是做Zonetranfer才會使用53/TCP。

正向解析(Forward DNS lookup):從主機名稱查到 IP 位址的流程
# dig www.hinet.net
 .....(略)
 ;; ANSWER SECTION:
 www.google.com. 5 IN A 74.125.31.103
 www.google.com. 5 IN A 74.125.31.104
 www.google.com. 5 IN A 74.125.31.105
 www.google.com. 5 IN A 74.125.31.106
 www.google.com. 5 IN A 74.125.31.147
 www.google.com. 5 IN A 74.125.31.99

 .....(略)

反向解析(Reverse DNS lookup):從 IP 位址查到主機名稱的流程
# dig -x 168.95.1.1
 .....(略)
 ;; ANSWER SECTION:
 1.1.95.168.in-addr.arpa. 5 IN PTR dns.hinet.net.
 .....(略)

範例:解析 192.168.122.0/24 網域內的郵件伺服器
DNS 伺服器(192.168.122.108):ns.linux.org.tw
郵件伺服器(192.168.122.225):mailer.linux.org.tw
測試用主機(192.168.122.76)
網域名稱:linux.org.tw

DNS 伺服器

  1. 編輯主設定檔 /etc/named.conf
  2. # vim /etc/named.conf
     listen-on port 53 { any; };
     listen-on-v6 port 53 { any; };
     allow-query { any; };

    # service named restart

  3. 開啟防火牆

  4. 測試:解析外部網域成功
  5. # dig www.google.com @192.168.122.108
     .....(略)
     ;; ANSWER SECTION:
     www.google.com. 250 IN A 74.125.31.105
     www.google.com. 250 IN A 74.125.31.99
     www.google.com. 250 IN A 74.125.31.147
     www.google.com. 250 IN A 74.125.31.103
     www.google.com. 250 IN A 74.125.31.104
     www.google.com. 250 IN A 74.125.31.106
     .....(略)

    # dig -x 168.95.1.1 @192.168.122.108
     .....(略)
     ;; ANSWER SECTION:
     1.1.95.168.in-addr.arpa. 86345 IN PTR dns.hinet.net.
     .....(略)

  6. 測試:解析內部網域的郵件伺服器失敗失敗
  7. # dig mailer.linux.org.tw @192.168.122.108
      沒有 ANSWER SECTION:

    # dig -x 192.168.122.225 @192.168.122.108
      沒有 ANSWER SECTION:

  8. 增加 zone 記錄,可放在主設定檔或 /etc/named.rfc1912.zones
  9. # vim /etc/named.rfc1912.zones
     zone "linux.org.tw" IN {
       type master;
       file "linux.org.tw.zone";
     };

     zone "122.168.192.in-addr.arpa" IN {
       type master;
       file "192.168.122.zone";
     };

  10. 新增並編輯 linux.org.tw.zone 檔案
  11. # cp -p /var/named/named.localhost /var/named/linux.org.tw.zone
    # vim linux.org.tw.zone
     $TTL 1D
     @ IN SOA dns root.linux.org.tw. (  // @為 zone 的名稱 linux.org.tw
              2013010201 ; serial
              1D ; refresh
              1H ; retry
              1W ; expire
              3H ) ; minimum
         NS dns
         IN MX 10 mailer
     dns A 192.168.122.108
     mailer A 192.168.122.225

  12. 新增並編輯 192.168.122.zone 檔案
  13. # cp -p /var/named/named.loopback /var/named/192.168.122.zone
    # vim 192.168.122.zone
     $TTL 1D
     @ IN SOA dns.linux.org.tw. root.linux.org.tw. (  // @為 zone 的名稱 122.168.192.in-addr.arpa
              2013010201 ; serial
              1D ; refresh
              1H ; retry
              1W ; expire
              3H ) ; minimum
         NS dns.linux.org.tw.
     108 PTR dns.linux.org.tw.
     225 PTR mailer.linux.org.tw.

  14. 重啟服務
  15. # service named restart

測試用主機(192.168.122.76)

  1. 增加一筆 DNS 位址 192.168.122.108
  2. # vim /etc/resolv.vonf
     nameserver 192.168.122.108
    # chattr +i /etc/resolv.vonf  // 當 NetworkManager 重啟後,會自動更改內容,此方法可鎖定檔案(-i 可移除鎖定)。不然就是要停止 NetworkManager 開機時啟動,並更改 /etc/sysconfig/network-scripts/ifcfg-eth* 內容。

  3. 正解 DNS 及郵件伺服器成功
  4. # dig dns.linux.org.tw
     .....(略)
     ;; ANSWER SECTION:
     dns.linux.org.tw. 86400 IN A 192.168.122.108

     .....(略)

    # dig mailer.linux.org.tw
     .....(略)
     ;; ANSWER SECTION:
     mailer.linux.org.tw. 86400 IN A 192.168.122.225

     .....(略)

  5. 反解 DNS 及郵件伺服器成功
  6. # dig -x 192.168.122.108
     .....(略)
     ;; ANSWER SECTION:
     108.122.168.192.in-addr.arpa. 86400 IN PTR dns.linux.org.tw.

     .....(略)

    # dig -x 192.168.122.225
     .....(略)
     ;; ANSWER SECTION:
     225.122.168.192.in-addr.arpa. 86400 IN PTR mailer.linux.org.tw.

     .....(略)

Web 伺服器(第二版)-網頁內容加密傳輸SSL

本人曾在 Web 伺服器(第一版)的第三個網頁中使用輸入帳密才能登入網頁,但其實帳密資料在傳輸的過程中是沒有加密的,故此篇文章將教您加密資料。

以下將以 Web 伺服器(第一版)的第三個網頁示範加密流程。
安裝金鑰產生套件 openssl # yum install -y openssl
安裝 Apache ssl 模組:mod_ssl # yum install -y mod_ssl
開啟防火牆 # iptables -A INPUT -i eth0 -p tcp -m state --state RELATED,ESTABLISHED -j ACCEPT
# iptables -A INPUT -i eth0 -p tcp -m state --state INVALID,NEW -j DROP
# iptables -A INPUT -i eth0 -p tcp -m tcp --dport 443 -m state --state NEW -j ACCEPT

產生憑證 # /etc/pki/tls/certs
# make server.key  // 產生私鑰(Private Key)
 umask 77 ; \
   /usr/bin/openssl genrsa -aes128 2048 > server.key
 Generating RSA private key, 2048 bit long modulus
 .........................................+++
 ................+++  e is 65537 (0x10001)
 Enter pass phrase:  // 輸入口令,至少 4 個字元
 Verifying - Enter pass phrase:
# ll server.key
 -rw-------. 1 root root 1766 Dec 17 15:13 server.key

移除私鑰口令 # openssl rsa -in server.key -out www139.key
 Enter pass phrase for server.key:
 writing RSA key
# ll www139.key
 -rw-r--r--. 1 root root 1675 Dec 17 15:30 www139.key

憑證請求檔(CSR、Certificate Signing Request) # make www139.csr
 umask 77 ; \
   /usr/bin/openssl req -utf8 -new -key www139.key -out www139.csr
 You are about to be asked to enter information that will be incorporated into your certificate request.
 What you are about to enter is what is called a Distinguished Name or a DN.
 There are quite a few fields but you can leave some blank
 For some fields there will be a default value,
 If you enter '.', the field will be left blank.
 -----
 // 輸入以下基本資訊
 Country Name (2 letter code) [XX]:TW
 State or Province Name (full name) []:TAIWAN
 Locality Name (eg, city) [Default City]:TAIPEI
 Organization Name (eg, company) [Default Company Ltd]:
 Organizational Unit Name (eg, section) []:
 Common Name (eg, your name or your server's hostname) []:
 Email Address []:XXX@XXX.com

 Please enter the following 'extra' attributes
 to be sent with your certificate request
 A challenge password []:
 An optional company name []:

# ll www139.csr
 -rw-------. 1 root root 1013 Dec 17 15:34 www139.csr

自簽電子證書(Self-Sign Certificate) # openssl x509 -req -in www139.csr -signkey www139.key -out www139.crt -days 365
 Signature ok
 subject=/C=TW/ST=TAIWAN/L=TAIPEI/O=NTU/OU=CC/emailAddress=CC@com.tw
 Getting Private key

在需要加密的網頁中,加入以下設定  <VirtualHost *:443>
   DocumentRoot /var/www/svhost
   ServerName secretapacheserver139.example.com
   SSLEngine on  // 以下 5 個參數是參考 /etc/httpd/conf.d/ssl.conf
   SSLProtocol all -SSLv2
   SSLCipherSuite ALL:!ADH:!EXPORT:!SSLv2:RC4+RSA:+HIGH:+MEDIUM:+LOW
   SSLCertificateFile /etc/pki/tls/certs/www139.crt
   SSLCertificateKeyFile /etc/pki/tls/private/www139.key

   <Directory /var/www/svhost>
    AuthName "Secret Hideout"
    AuthType basic
    AuthUserFile /var/www/svhost/users
    require valid-user
   </Directory>
 </VirtualHost>

Samba 伺服器(第三版)

Samba 伺服器(第三版)修正了一些步驟並增加了觀念,但也簡化了內容,建議從舊版看起,可以了解作者遇到的問題和觀念的修正。

原始文章:Samba 伺服器(第二版)

微軟的網路芳鄰檔案系統為 CIFS(Common Internet File System),若想讓 Unix-Like 主機加入微軟的網路芳鄰並共享資源時,就必須架設 Samba Server,目的就是要讓微軟的使用者在網路芳鄰中看到這台主機的 NetBIOS name,進而存取共享的資源。


以下的示範,將分為二部份:
  1. 建立一個共享資料夾為 share(/srv/share),不必驗證即可登入與上傳
  2. 建立一個共享資料夾為 mygroup(/srv/mygroup),必須使用者驗證成功後,才可登入與上傳
安裝 Samba 伺服器(10.10.10.137) # yum install -y samba samba-client samba-common cifs-utils
開機時啟動 # chkconfig nmb on ; chkconfig smb on
開啟防火牆
# iptables -A INPUT -i eth0 -p tcp -m tcp --dport 21 -m state --state NEW -j ACCEPT
# iptables -A INPUT -i eth0 -p tcp -m state --state RELATED,ESTABLISHED -j ACCEPT
# iptables -I INPUT -i eth0 -p udp --dport 137:138 -m state --state NEW -j ACCEPT
# iptables -I INPUT -i eth0 -p tcp -m multiport --dport 139,445 -m state --state NEW -j ACCEPT
# service iptables save
# iptables -L -n | grep --color -Ew '13[789]|445'


Part1:建立一個共享資料夾為 share(/srv/share),不必驗證即可登入與上傳,編輯設定檔 /etc/samba/smb.conf

# mkdir /srv/share   // 建立共享資料夾
# chmod 2777 /srv/share  // 變更共享資料夾權限
# ll -dZ /srv/share  // SELinux 設定
 drwxrwsr-x. root root unconfined_u:object_r:var_t:s0 /srv/share
# chcon -t samba_share_t /srv/share
# ll -dZ /srv/share
 drwxrwsr-x. root root unconfined_u:object_r:samba_share_t:s0 /srv/share

# vim /etc/samba/smb.conf
 [global]
 workgroup = career
 security = usr
 passdb backend = tdbsam  // 檔案是 passdb.tdb

 [share]  // 共享目錄名稱,使用 smbclient 查詢時所顯示的共享資料夾名稱
 path = /srv/share
 guest ok = yes
 guest only = yes
 read only = no  // 同等於 writeable = yes

使用 testparm 測試 /etc/samba/smb.conf 語法是否正確。 # testparm  // 自動載入 /etc/samba/smb.conf;參數 -v 詳細列出
啟動服務 # service nmb start; service smb start
Samba 客戶端(10.10.10.129)測試
  1. 找出目前網域上的 Workgroup
  2. # nmblookup -A 10.10.10.160  // 亦可用主機名稱

  3. 查詢分享資源
  4. # smbclient -L 10.10.10.160  // 亦可用主機名稱

  5. 登入 samba 伺服器,並上傳資料到 /srv/share
  6. # smbclient //10.10.10.160/share
     Enter root's password: 直接按 Enter 進入
     Anonymous login successful
     Domain=[CAREER] OS=[Unix] Server=[Samba 3.5.10-125.el6]
    smb: \> put install.log
     putting file install.log as \install.log (9833.5 kb/s) (average 9833.7 kb/s)

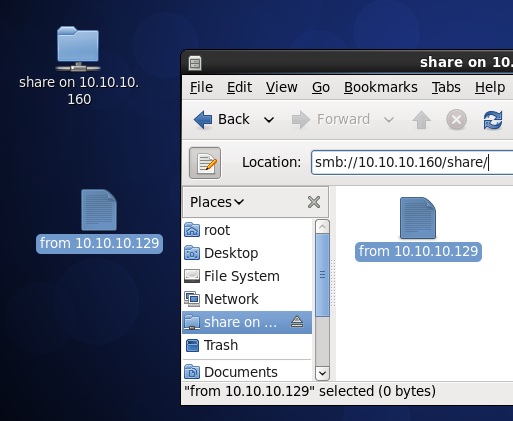
  7. 使用檔案總管 nautilus 登入並上傳
  8. # nautilus &

Part2:建立一個共享資料夾為 mygroup(/srv/mygroup),必須使用者驗證成功後,才可登入與上傳,編輯設定檔 /etc/samba/smb.conf

# useradd guest2  // 新增使用者guest2,當他登入/srv/mygroup時,是被目錄的安全性拒絕,而不是samba伺服器。
# passwd guest2
# groupadd -g 8000 sambauser
# mkdir /srv/mygroup       // 建立共享資料夾
# chgrp sambauser /srv/mygroup   // 變更共享資料夾群組
# chmod 2777 /srv/mygroup    // 變更共享資料夾權限
# chcon -t samba_share_t /srv/mygroup  // SELinux 設定

# vim /etc/samba/smb.conf
 [global]
 workgroup = career
 security = usr
 passdb backend = tdbsam  // 檔案是 passdb.tdb

 [share]  // 共享目錄名稱,使用 smbclient 查詢時所顯示的共享資料夾名稱
 path = /srv/share
 guest ok = yes
 guest only = yes
 read only = no  // 同等於 writeable = yes

 [members]  // 共享目錄名稱,使用 smbclient 查詢時所顯示的共享資料夾名稱
 path = /srv/mygroup
 guest ok = no
 guest only = no
 read only = no  // 同等於 writeable = yes
 vaild users = @sambauser  // 允許群組成員存取
 invaild users = guest  // 拒絕使用者guest存取

samba使用者條件:
  1. 必須為Linux用戶
  2. 使用smbpasswd建立登入密碼,注意!使用者的samba密碼與系統登入密碼是不相同的。
新增 Samba 使用者
  • 『user』,群組為『sabmauser』,密碼為『1』
  • 『guest』,群組為『sabmauser』,密碼為『1』
  • 『guest2』,不屬於群組『sabmauser』,密碼為『1』
  • # useradd -G 8000 -s /sbin/nologin user
    # smbpasswd -a sambauser1
     New SMB password: 『1』
     Retype new SMB password: 『1』
     Added user sambauser.

    # useradd -G 8000 -s /sbin/nologin guest # smbpasswd -a guest
     New SMB password: 『1』
     Retype new SMB password: 『1』
     Added user sambauser2.

    # useradd -s /sbin/nologin guest2 # smbpasswd -a guest2
     New SMB password: 『1』
     Retype new SMB password: 『1』
     Added user sambauser2.

    查詢 samba 使用者資料庫 # pdbedit -L  // 查看 samba 使用者是否已建立;-v詳細模式
     user:505:
     guest:500:guest
     guest2:504:

    啟動服務
    # service smb start
    Samba 客戶端(10.10.10.129)測試 登入 samba 伺服器 # smbclient //10.10.10.160/members -U user
     Enter user's password:
     Domain=[CAREER] OS=[Unix] Server=[Samba 3.5.10-125.el6]
     smb: \> exit

    # smbclient //10.10.10.160/members -U guest
     Enter guest's password:
     Domain=[CAREER] OS=[Unix] Server=[Samba 3.5.10-125.el6]
     tree connect failed: NT_STATUS_ACCESS_DENIED  // 此連線是被samba伺服器拒絕

    # smbclient //10.10.10.160/members -U guest2
     Enter guest2's password:
     Domain=[CAREER] OS=[Unix] Server=[Samba 3.5.10-125.el6]
     tree connect failed: NT_STATUS_ACCESS_DENIED  // 此連線是被目錄拒絕

    FTP伺服器

    建立一個可以讓使用者登入家目錄及匿名者上傳的 FTP 伺服器。


    FTP 伺服器(10.10.10.160)


    安裝 # yum install vsftpd
    開機時啟動 # chkconfig vsftpd on
    啟動服務 # service vsftpd start

    Part1:讓匿名者上傳檔案


    編輯組態檔 /etc/vsftpd/vsftpd.conf # vim /etc/vsftpd/vsftpd.conf
     anon_root=/var/ftp/pub
     anonymous_enable=YES
     write_enable=YES
     anon_upload_enable=YES

    # setsebool -P allow_ftpd_anon_write on

    # service vsftpd restart

    產生上傳目錄 # mkdir /var/ftp/pub/upload
    # chmod 1777 /var/ftp/pub/upload
    # ll -d /var/ftp/pub/upload
     drwxrwxrwt. 2 root root 4096 Dec 13 13:50 /var/ftp/pub/upload

    防火牆設定 # iptables -A INPUT -i eth0 -p tcp -m state --state ESTABLISHED,RELATED -j ACCEPT
    # iptables -A INPUT -i eth0 -p tcp -m state --state NEW,INVALID -j DROP
    # iptables -I INPUT -i eth0 -p tcp --dport 21 -m state --state NEW -j ACCEPT

    FTP 客戶端測試(10.10.10.129) # ftp 10.10.10.160
      Connected to 10.10.10.160 (10.10.10.160).
      220 (vsFTPd 2.2.2)
      Name (10.10.10.160:root): anonymous
      331 Please specify the password.
      Password: 直接按 Enter 進入
      230 Login successful.
      Remote system type is UNIX.
      Using binary mode to transfer files.
    ftp> dir
      227 Entering Passive Mode (10,10,10,160,86,44).
      150 Here comes the directory listing.
      drwxrwxrwt 2 0 0 4096 Dec 13 05:50 upload
      226 Directory send OK.
    ftp> cd upload
      250 Directory successfully changed.
    ftp> put install.log
      local: install.log remote: install.log
      227 Entering Passive Mode (10,10,10,160,158,187).
      553 Could not create file.  上傳檔案被拒絕!?

    註:成功連線後,使用指令 dir 或 ls 查看內容(包含其他指令,例如 put..),但畫面卻卡住,大部份是 FTP 伺服器沒有載入 nf_conntrack_ftp 模組,因為伺服器回應時不是透過 21port,而是以一個亂數產生的 port number 回應,而這個 port number 會被防火牆阻擋。 10.10.10.160# modprobe nf_conntrack_ftp
    解決匿名上傳檔案被拒絕的問題(SELinux) # tail -f /var/log/messages
     Dec 13 15:12:41 localhost setroubleshoot: [avc.ERROR] Plugin Exception catchall_boolean #012Traceback
     (most recent call last):#012 File "/usr/lib64/python2.6/site-packages/setroubleshoot/analyze.py", line 191, in
     analyze_avc#012 report = plugin.analyze(avc)#012 File "/usr/share/setroubleshoot/plugins/catchall_boolean.py",
     line 90, in analyze#012 man_page = self.check_for_man(b)#012 File
     "/usr/share/setroubleshoot/plugins/catchall_boolean.py", line 76, in check_for_man#012 man_page =
     name.split("_")[0] + "_selinux"#012AttributeError: 'tuple' object has no attribute 'split' Dec 13 15:12:41
     localhost setroubleshoot: SELinux is preventing /usr/sbin/vsftpd from write access on the directory upload.
     For complete SELinux messages. run sealert -l c5f97a15-0622-4443-bdb3-a9ae3ac693c9  // 這個錯誤訊息
     要裝 setroubleshoot 才會顯示


    # sealert -l c5f97a15-0622-4443-bdb3-a9ae3ac693c9
     If you want to allow /usr/sbin/vsftpd to be able to write to shared public content Then you need to
     change the label on upload to public_content_rw_t
    , and potentially turn on the
     allow_httpd_sys_script_anon_write boolean.

    # ll -dZ /var/ftp/pub/upload/
     drwxrwsrwt. root root unconfined_u:object_r:public_content_t:s0 /var/ftp/pub/upload/
    # chcon -t public_content_rw_t /var/ftp/pub/upload/
    # ll -dZ /var/ftp/pub/upload/
     drwxrwsrwt. root root unconfined_u:object_r:public_content_rw_t:s0 /var/ftp/pub/upload/

    Part2:讓系一般使用者帳密登入自己家目錄,並讓家目錄成為使用者的根目錄


    使用一般使用者帳密登入 # ftp 10.10.10.160
     Connected to 10.10.10.160 (10.10.10.160).
     220 (vsFTPd 2.2.2)
     Name (10.10.10.160:root): guest
     331 Please specify the password.
     Password:
     500 OOPS: cannot change directory:/home/guest
     Login failed.

    編輯組態檔 /etc/vsftpd/vsftpd.conf # vim /etc/vsftpd/vsftpd.conf
     anon_root=/var/ftp/pub
     anonymous_enable=YES
     write_enable=YES
     anon_upload_enable=YES

     local_enable=YES
     chroot_local_user=YES
     passwd_chroot_enable=YES  // 此設定是參考/etc/passwd內容

    # setsebool -P ftp_home_dir on

    # service vsftpd restart

    chroot限制使用者到其他目錄,只能存取自己家目錄底下的子目錄。 # ftp 10.10.10.160
     Connected to 10.10.10.160 (10.10.10.160).
     220 (vsFTPd 2.2.2)
     Name (10.10.10.160:root): guest
     331 Please specify the password.
     Password:
     230 Login successful.
     Remote system type is UNIX.
     Using binary mode to transfer files.

    ftp> pwd
     257 "/"

    NFS伺服器(第二版)

    NFS(Network FileSystem)的功能就是可以透過網路,讓不同的機器、不同的作業系統、可以彼此分享個別的檔案 (share files) 並進行操作。


    NFS Server(10.10.10.160)
    NFS 需要遠端程序呼叫 (RPC) 的服務,因此安裝 rpcbind 套件。
    RPC服務啟動後,會開啟應用程式portmapper(111 port),這支應用程式的功能有2個:
    1. NFS或NIS服務啟動時,會先portmapper註冊,由portmapper動態分配port number。
    2. 讓客戶端提出NFS服務要求時,必須透過portmapper得到正確的NFS資訊。
    # yum install -y nfs-utils rpcbind
    開機時啟動
    # chkconfig nfs on
    # chkconfig rpcbind on

    啟動服務
    # service rpcbind start  // 先啟動
    # service nfs start  // NFS服務向portmapper註冊,要求mountd的port number。

    註:NFS啟動後會提供2個服務程式rpc.mountd(/etc/exports)及rpc.nfsd。

    新增1GB容量的分割區供客戶端掛載 # palimpsest &  // 新分割代號/dev/sda4,使用palimpsest的好處是不用重開機。
    # mkfs.ext4 /dev/sda4
    # mkdir /mnt/nfs  // 建立掛載點
    # chmod 1775 /mnt/nfs
    # mount /dev/sda4 /mnt/nfs

    固定mountd的port number,因為開機或重啟服務時port number是隨機產生的,如果沒有固定,無法進行防火牆的設定。 # cp /etc/sysconfig/nfs /etc/sysconfig/nfs.bak
    # sed 's/#MOUNTD_PORT=892/MOUNTD_PORT=12345/g' /etc/sysconfig/nfs
    # sed -i 's/#MOUNTD_PORT=892/MOUNTD_PORT=12345/g' /etc/sysconfig/nfs  // 參數-i:直接修改讀取的檔案內容,而不是由螢幕輸出。
    # service nfs restart  // 固定port number之後必須重啟服務才會生效

    防火牆設定:請注意先後順序
    # iptables -F
    # service iptables save
    # iptables -I INPUT -i eth0 -m state --state ESTABLISHED,RELATED -j ACCEPT
    # iptables -I INPUT -i eth0 -m state --state NEW,INVALID -j DROP
    # iptables -I INPUT -i eth0 -p tcp --dport 111 -m state --state NEW -j ACCEPT  // 沒開111port,客戶端rpcinfo和showmount會卡住
    # iptables -I INPUT -i eth0 -p tcp --dport 111 -m state --state NEW -j ACCEPT
    # iptables -I INPUT -i eth0 -p tcp --dport 12345 -m state --state NEW -j ACCEPT
    # iptables -I INPUT -i eth0 -p tcp --dport 12345 -m state --state NEW -j ACCEPT
    # iptables -I INPUT -i eth0 -p tcp --dport 2049 -m state --state NEW -j ACCEPT

    NFS 伺服器端分享資料夾設定
    # vim /etc/exports
     /mnt/nfs *(rw,sync)
    # exportfs -r

    補充:
  • NFS真正的設定檔在/var/lib/nfs/etab
  • # cat /var/lib/nfs/etab
     /mnt/nfs *(ro,sync,wdelay,hide,nocrossmnt,secure,root_squash,no_all_squash,no_subtree_check,secure_locks,acl,anonuid=65534,anongid=65534)

  • 修改 /etc/exports 內容後,重啟 NFS 服務套用更新,但會使得在線上的使用者斷線,使用以下指令可避免此情況發生。
  • # exportfs -rv  // 參數『v』代表詳細模式,可以不用加
  • 以下四個參數,讓 NFS 客戶端使用者登入 NFS 伺服端時,轉換身份(以 UID 為主)並取得相對應的權限操作。


  • NFS Client(10.10.10.129) # rpcinfo -p 10.10.10.160  // 查看NFS伺服器是否有提供NFS服務
    # showmount -e 10.10.10.160
     Export list for 10.10.10.160:
     /mnt/nfs *
    # mkdir /mnt/nfsclient
    # mount 10.10.10.160:/mnt/nfs /mnt/nfsclient
    # df -h
     檔案系統 1K- 區段 已用 可用 已用 % 掛載點
     10.10.10.160:/mnt/nfs 996M 18M 929M 2% /mnt/nfsclient

    注意:無法對資料夾/mnt/nfsclient進行新增刪除的操作。
    NFS客戶端的身份為管理者root,但登入NFS伺服端後,系統會變更成使用者nfsnobody,而nfsnobody的權限對資料夾只有讀的權限。
    有2種方法可以解決這個問題,都是在NFS伺服器端上設定
    1. 將共享資料夾的使用者權限變更成xx7
    2. 在/etc/exports組態檔中加入no_root_squash參數,讓客戶端的管理者登入後亦維持管理者身份但此舉會降低系統安全性的風險
    開機時掛載
    # vim /etc/fstab
     10.10.10.160:/mnt/nfs /mnt/nfsclient/ nfs ro 0 0

    Troubleshooting


  • 無法掛載:若出現被 NFS Server 拒絶的訊息,請先檢查是否有權限存取。假設 NFS Server 設定只有 10.10.10.128 可以存取,但目前的 NFS Client 的 IP 是 10.10.10.129,因此會被拒絕。
  • client # mount nfs_server_ip:/var/ftp /mnt/nfsclient
       mount.nfs: access denied by server while mounting nfs_server_ip:/var/ftp
    client # showmount -e nfs_server_ip
       Export list for nfs_server_ip:
       /var/ftp 10.10.10.128

    rsync伺服器-異地備援

    實驗目的:我有2台伺服器,1台是NAS(Rsync server),另1台是apache(Rsync client),我要將apache的資料壓縮後備份到NAS上,但很怕毀了NAS上的資料,所以就自己先實驗一下,以免造成不可挽回的下場。

    Rsync server(10.10.10.156):備份伺服器
    Rsync client(10.10.10.159):備份來源

    Rsync Server(10.10.10.156)

    安裝並設定服務狀態
    # yum install -y rsync xinetd
    # chkconfig rsync on; chkconfig xinetd on
    # service xinetd start

    開啟 rsync 服務
    # vim /etc/xinetd.d/rsync
      service rsync
     {
      disable = no
      flags = IPv6
      socket_type = stream
      wait = no
      user = root, user1
      // 請記得加入連線使用者名稱,若沒有加入,client 端同步時會出現錯誤訊息,請參考 Troubleshooting1
      server = /usr/bin/rsync
      server_args = --daemon
      log_on_failure += USERID
     }
    # service xinetd restart

    防火牆設定
    # iptables -A INPUT -p tcp -m tcp --dport 873 -j ACCEPT
    備份組態檔設定
    # vim /etc/rsyncd.conf
      [rsyncserver]  // 主機代號
      path = /home/backup  // 備份資料的路徑
      auth users = user1
      uid = root
      gid = root
      secrets file = /etc/rsyncd.secrets  // 認證密碼檔
      read only = no
    # mkdir /home/backup
    # rsync --daemon --config=/etc/rsyncd.conf
    // 載入設定檔,若沒載入有設定,client 端同步時會出現錯誤訊息,請參考Troubleshooting2

    認證密碼檔
    # vim /etc/rsyncd.secrets
     user1:1  // user_name:password
    # chmod 600 /etc/rsyncd.secrets

    Rsync Client(10.10.10.156)

    在 client 端的部份,我使用 shell script 加上 crontab 自動產生及刪除檔案,這樣就不用手動去增加或刪除資料。

    shell script 內容:每分鐘產生一個壓縮檔,並只保留 10 分鐘以內的壓縮檔,舊的資料會自動刪除。
    # vim test.sh
     #!/bin/bash
     YMD=$(date +%Y-%m-01-%M-01)
     YMD70=$(date +%Y-%m-01-%M-01 --date -10minutes)
     basedir="/var/www/webserver_backup"
     /bin/tar -zcvf "$basedir"/"$YMD".tar.gz /var/www/html/*
     /bin/rm -rf "$basedir"/"$YMD70".tar.gz

    自動排程設定
    # crontab -l
     */1 * * * * /root/test.sh

    定時執行程式並監看結果 -watch
    # cd /var/www/webserver_backup
    # watch ls -lh


    同步指令
    # vim /etc/rsyncd.secrets
     1
    # chmod 600 /etc/rsyncd.secrets
    # rsync -av --progress --delete --port=873 --password-file=/etc/rsyncd.secrets /var/www/webserver_backup/ user1@10.10.10.156::rsyncserver

    第一次備份:

    第二次備份:保持兩邊同步,所以會有deleting動作

    Troubleshooting1

    # rsync -av --progress --delete --port=873 --password-file=/etc/rsyncd.secrets /var/www/webserver_backup/ user1@10.10.10.156::rsyncserver
     @ERROR: auth failed on module rsyncserver
     rsync error: error starting client-server protocol (code 5) at main.c(1503) [sender=3.0.6]

    Troubleshooting2

    # rsync -av --progress --delete --port=873 --password-file=/etc/rsyncd.secrets /var/www/webserver_backup/ user1@10.10.10.156::rsyncserver
     rsync: failed to connect to 10.10.10.156: Connection refused (111)
     rsync error: error in socket IO (code 10) at clientserver.c(124) [sender=3.0.6]

    定期自動備份伺服器資料(前篇)

    新增日期:後篇請參考伺服器-rsync 異地備援

    備份網頁伺服器上的資料是非常的重要,以免系統損毀後,全部資料都不見。

    範例:備份半年的資料,自動排程每月 1 日凌晨6點進行備份
    1. 備份路徑 /var/www/wsbackup
    2. 維護通知信件內容
    3. # echo '已完成網頁伺服器自動備份' > /root/backuplog.txt
    4. shell script 的路徑 /bin/websever-backup.sh
    5. # vim /bin/websever-backup.sh
       #!/bin/bash
       YMD=$(date +%Y-%m-%d)
       YMD180=$(date +%Y-%m-%d --date -180days)
       basedir="/var/www/wsbackup"
       /bin/tar -zcvf "$basedir"/"$YMD".tar.gz /var/www/html/*  // 備份當月網頁伺服器資料
       /bin/rm -rf "$basedir"/"$YMD180".tar.gz  // 刪除半年以前的備份
       export LANG=zh_TW.UTF-8
       mail -s "網頁伺服器維護通知信" mail@address < /root/backuplog.txt

    6. 自動排程
    7. # crontab -e
       0 6 1 * * /root/websever-backup.sh

    合體技-LDAP+NFS+Autofs

    簡易的 LDAP 伺服器架設:原文出處

    伺服器端(10.10.10.154)
    安裝 # yum install -y openldap-servers
    更改 Domain Component(dc)設預值:my-domain→example # cd /etc/openldap/slapd.d
    # grep my-domain -r .
     ./cn=config/olcDatabase={1}monitor.ldif: l,cn=auth" read by dn.base="cn=manager,dc=my-domain,dc=com" read by * none
     ./cn=config/olcDatabase={2}bdb.ldif:olcSuffix: dc=my-domain,dc=com
     ./cn=config/olcDatabase={2}bdb.ldif:olcRootDN: cn=Manager,dc=my-domain,dc=com

    # vim ./cn\=config/olcDatabase\=\{1\}monitor.ldif
    # vim ./cn\=config/olcDatabase\=\{2\}bdb.ldif

    LDAP 管理員密碼(建議寫在 olcRootDN 附近) # vim ./cn\=config/olcDatabase\=\{2\}bdb.ldif
     olcRootPW: secret

    重啟服務 # /etc/init.d/slapd restart
    觀察 process 與 port # netstat -na | grep -w 389 ; netstat -nap | grep slapd
    防火牆設定 # iptables -A INPUT -p tcp -m tcp --dport 389 -j ACCEPT
    migration tool(轉換 / 遷徙工具):將原有帳號轉換成 LDAP 格式 # yum install -y migrationtools.noarch
    # /usr/share/migrationtools/migrate_passwd.pl /etc/passwd

    NFS 設定 # mkdir -p /home/guests
    # useradd -d /home/guests/ldapuser2 -u 1702 ldapuser2
    # /usr/share/migrationtools/migrate_passwd.pl /etc/passwd
    # vim /etc/exports
     /home/guests *(rw,sync)

    客戶端(10.10.10.155)
    安裝 # yum install -y openldap-clients nss-pam-ldapd
    認證來源設定 # setup


    檔案 example.com.ldif 的內容 # cd /etc/openldap/
    # vim example.com.ldif
     dn: dc=example,dc=com
     dc: example
     o: example
     ObjectClass: organization
     ObjectClass: dcObject

    檔案 people.example.com.ldif 的內容 # vim people.example.com.ldif
     dn: ou=people,dc=example,dc=com
     ObjectClass: top
     ObjectClass: organizationalUnit
     ou: people

    檔案 ldapuser2.people.example.com.ldif 的內容 # vim ldapuser2.people.example.com.ldif
     dn: uid=ldapuser2,ou=people,dc=example,dc=com
     uid: ldapuser2
     cn: LDAP Test User 2
     objectClass: account
     objectClass: posixAccount
     objectClass: top
     objectClass: shadowAccount
     userPassword:
     {crypt}$6$YvAT5G9T$mLFxORGWK4yGIMzEX0ZAOoLd.U2AbEBIkwIJQ8.vzd0GoBRRLoVn6CpXOGvJHG03xknIYP6RJuCel3Vr7gyQ/.
     shadowLastChange: 15233
     shadowMin: 0
     shadowMax: 99999
     shadowWarning: 7
     loginShell: /bin/bash
     uidNumber: 1702
     gidNumber: 1702
     homeDirectory: /home/guests/ldapuser2

    新增及搜尋 ldap 資訊 # ldapadd -v -x -D "cn=Manager,dc=example,dc=com" -f example.com.ldif -w secret
    # ldapadd -v -x -D "cn=Manager,dc=example,dc=com" -f people.example.com.ldif -w secret
    # ldapadd -v -x -D "cn=Manager,dc=example,dc=com" -f ldapuser2.people.example.com.ldif -w secret
    # ldapsearch -x -b "dc=example,dc=com"


    設定 autofs # echo '/home/guests /etc/auto.guests' >> /etc/auto.master
    # echo '* -rw,hard,intr 10.10.10.154:/home/guests/&' >> /etc/auto.guests
    # su - ldapuser2
     id: cannot find name for group ID 1702
    $ pwd  // 成功掛載路徑,若失敗會顯示 -bash-4.1$
     /home/guests/ldapuser2
    $ df

    收發信件實驗環境架設實作

    名詞解釋:
    • MTA/MDA:郵件伺服器
    • Cache-Only DNS:解析本地郵件伺服器
    • MUA:客戶端收信軟體

    各主機所需套件:
    • MTA/MDA(10.10.10.156):postfix、dovecot
    • DNS(10.10.10.142):bind
    • MUA1(10.10.10.158):thunderbird
    • MUA2(10.10.10.159):thunderbird

    DNS(10.10.10.142)
    # yum install -y bind
    # chkconfig named on

    # iptables -A INPUT -p tcp -m tcp --dport 53 -j ACCEPT
    # iptables -A INPUT -p udp -m udp --dport 53 -j ACCEPT

    # vim /etc/named.conf
     listen-on port 53 { any; };
     allow-query     { any; };
     recursion yes;  // 這樣其他的主機才有辦法透過本地的 DNS 伺服器,訪問外面的 DNS 伺服器。

     // MTA
     zone "s156.com" IN {
       type master;
       file "slaves/s156.com.zone";
     };

    # vim /var/named/slaves/s156.com.zone
     @   IN SOA ns1.s156.com. root.s156.com. (
           2012102814 43200 21600 3600000 86400 )
         IN NS ns1
         IN MX 10 mail.s156.com.
     ns1   IN A 10.10.10.142
     mail   IN A 10.10.10.156

    # service named start

    MTA/MDA(10.10.10.156)
    # useradd user1  // 在郵件伺服器上建立 2 個郵件帳號
    # useradd user2
    # echo '1' | passwd --stdin user1  // 請儘量不要使用此方式更改密碼,因為會留下歷史記錄。
    # echo '1' | passwd --stdin user2

    # yum install -y postfix dovecot
    # chkconfig postfix on; chkconfig dovecot on

    # iptables -A INPUT -p tcp -m tcp --dport 25 -j ACCEPT  // 開啟防火牆
    # iptables -A INPUT -p tcp -m tcp --dport 110 -j ACCEPT

    # vim /etc/resolv.conf
     nameserver 10.10.10.142  // 指向本地的 DNS 伺服器

    # hostname
     postman.s156.com
    # vim /etc/postfix/main.cf
     myhostname = postman.s156.com
     mydomain = s156.com
     myorigin = $myhostname
     inet_interfaces = all
     mydestination = $myhostname, localhost.$mydomain, localhost, s156.com
     mynetworks = 127.0.0.0/8, 10.10.10.0/24

    # vim /etc/dovecot/dovecot.conf
     protocols = imap pop3 lmtp  // 使用 SSL 加密,不必新增 pop3s 或 imaps 的選項,因此 pop3 選項已包含。
     listen = *, ::

    # vim /etc/dovecot/conf.d/10-auth.conf
     disable_plaintext_auth = no

    # vim /etc/dovecot/conf.d/10-mail.conf
     mail_location = mbox:~/mail:INBOX=/var/mail/%u

    # service postfix start; service dovecot start

    MUA1(10.10.10.158):收發郵件伺服器帳號 user1 的信件
    # yum install -y thunderbird

    # vim /etc/resolv.conf
     nameserver 10.10.10.142  // 指向本地的 DNS 伺服器
    # chattr +i /etc/resolv.conf  // DHCP或NetworkManager重啟後,會修改resolv.conf的內容,解決方法第一種使用靜態IP,第二種使用指令chattr鎖住檔案(解除鎖定參數-i)

    # iptables -A INPUT -p tcp -m tcp --dport 25 -j ACCEPT
    # iptables -A INPUT -p tcp -m tcp --dport 110 -j ACCEPT

    MUA2(10.10.10.159):收發郵件伺服器帳號 user2 的信件
    # yum install -y thunderbird

    # vim /etc/resolv.conf
     nameserver 10.10.10.142  // 指向本地的 DNS 伺服器
    # chattr +i /etc/resolv.conf  // DHCP或NetworkManager重啟後,會修改resolv.conf的內容,解決方法第一種使用靜態IP,第二種使用指令chattr鎖住檔案(解除鎖定參數-i)

    # iptables -A INPUT -p tcp -m tcp --dport 25 -j ACCEPT
    # iptables -A INPUT -p tcp -m tcp --dport 110 -j ACCEPT

    測試

    • MUA1(user1@s156.com) 寄信給 MUA2(user2@s156.com)
    • MUA2(user2@s156.com) 寄信給 MUA1(user1@s156.com)
    MUA1 寄信給 MUA2
    • 開啟 thunderbird
    • 設定帳號
    • 寄信給 MUA2(user2@s156.com)
    MUA2 寄信給 MUA1
    • 開啟 thunderbird
    • 設定帳號
    • 寄信給 MUA1(user1@s156.com)

    結果

    好用小套件-@penWebMail(問題篇)

    瀏覽器:IE9、Chorme22、Firefox16 

    問題 1:撰寫新郵件時,信件格式無法變更成 HTML 格式。


    Firefox 解決方法:Firefox 不會有這個問題

    IE 解決方法:【工具】→【相容性檢視】

    Chrome 解決方法:安裝套件 IE Tat Multi(Enhance),並依照紅色框內容設定。


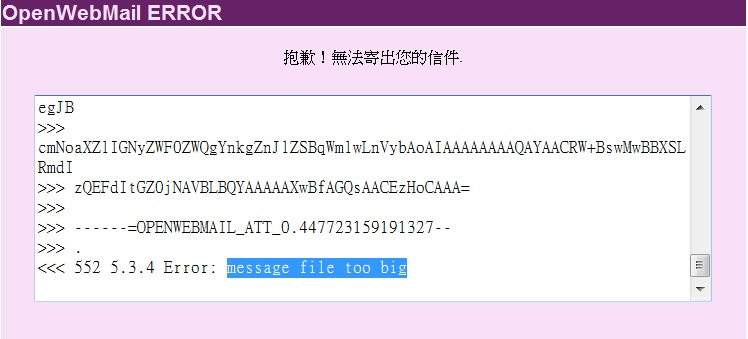
    問題 2:設定附件大小預設是 8MB,超過限制的附件雖然還是可以上傳,但寄不出去。


    # vim /etc/postfix/main.cf
     message_size_limit = 26214400  // 限制 25MB(25*1024*1024=26,214,400)
    如果還是寄不出去,就是你所在區網的 MTA 有限制附件大小,像台灣大學是限制 25MB。


    問題 3:限制上傳附件大小,當上傳附件超過限制大小,瀏覽器會出現警示訊息。


    # vim /var/www/cgi-bin/openwebmail/etc/openwebmail.conf
     attlimit 25000  // 單位是 KB


    問題 4:通訊錄大小限制與匯入檔案大小限制
    # vim /var/www/cgi-bin/openwebmail/etc/openwebmail.conf
     abook_maxsizeallbooks 1000000  // 通訊錄大小限制
     abook_importlimit 100000  // 匯入檔案大小限制

    好用小套件-@penWebMail

    透過網路介面收發信件,而且使用 yum 安裝,讓整個步驟簡單的要命,當然你要先搞定 postfix 及 dovecot server。

    網路郵局 @penWebMail
    官方網站:http://www.openwebmail.org/

    官方網站有提供 yum 安裝流程,請參考官方安裝流程

    安裝 # wget http://openwebmail.org/openwebmail/download/redhat/rpm/release/openwebmail.repo -P /etc/yum.repos.d/  //-P 是指定路徑
    # yum install -y openwebmail perl-CGI
    # /var/www/cgi-bin/openwebmail/openwebmail-tool.pl --init
     Please change '/var/www/cgi-bin/openwebmail/etc/dbm.conf' from  // 出現警告訊息,請修改 dbm.conf 的內容
     dbm_ext          .db
     dbmopen_ext        .db
     dbmopen_haslock      no

     to

     dbm_ext          .pag
     dbmopen_ext        none
     dbmopen_haslock      no


     And execute '/var/www/cgi-bin/openwebmail/openwebmail-tool.pl --init' again!  // 修改完成後再執行一次

     ps: If you are running openwebmail in persistent mode,
       don't forget to 'touch openwebmail*.pl', so speedycgi
       will reload all scripts, modules and conf files in --init.

    # /var/www/cgi-bin/openwebmail/openwebmail-tool.pl --init
     creating db /var/www/cgi-bin/openwebmail/etc/maps/b2g ...done.
     creating db /var/www/cgi-bin/openwebmail/etc/maps/g2b ...done.
     creating db /var/www/cgi-bin/openwebmail/etc/maps/lunar ...done.

     Creating UTF-8 locales...
     langconv ar_AE.CP1256 -> ar_AE.UTF-8
     langconv ar_AE.ISO8859-6 -> ar_AE.UTF-8
     langconv bg_BG.CP1251 -> bg_BG.UTF-8
     langconv ca_ES.ISO8859-1 -> ca_ES.UTF-8
     langconv cs_CZ.ISO8859-2 -> cs_CZ.UTF-8
     ...done.

     Welcome to the OpenWebMail!
     This program is going to send a short message back to the developer,
     so we could have the idea that who is installing and how many sites are
     using this software, the content to be sent is:

     OS: Linux 2.6.32-279.11.1.el6.x86_64 x86_64
     Perl: 5.010001
     WebMail: OpenWebMail 2.53 20080123

     Send the site report?(Y/n) y
     sending report...
     Thank you.

    修改@penWebMail組態檔 # vim /var/www/cgi-bin/openwebmail/etc/openwebmail.conf
     enable_spamcheck     yes
     enable_learnspam     yes
     webdisk_rootpath     /
     webdisk_lshidden     yes

    # service httpd restart

    使用瀏覽器登入,看到畫面很開心 XD,但登入後慘劇就發生了(登入時無法使用 root 帳密,因為預設是拒絕管理者登入)。


    被 SELinux 擋住了,雖然官方文件有說明,要將 SELinux 關閉或改成 Permissive,但這樣系統的安全性就降低了


    解決 SELinux 問題,引用以下網址內容 http://openwebmail.acatysmoof.com/archive/html/owm-users/owm-users.200512/msg00007.html
    解決問題的指令如下: # chcon -u system_u /var/log/openwebmail.log
    # chcon -t httpd_sys_script_rw_t /var/log/openwebmail.log
    # chcon -t httpd_unconfined_script_exec_t /var/www/cgi-bin/openwebmail/openwebmail*

    SMTP伺服器

    20121101新增:收發信件實驗環境架設實作

    系統組成:
  • MUA:Mail User Agent
  • MTA:Mail Transfer Agent
  • MDA:Mail Delivery Agent
  • 請注意:MUT→MTA 或 MTA→MTA 是使用 SMTP,MDA→MUA 是使用 POP3 或 IMAP。
    郵件通訊協定:
  • SMTP(Simple Mail Transport Protocol):寄信使用的協定,套件名稱postfix
  • POP3(Post Office Protocol) / IMAP(Internet Mail Application Protocol):收信使用的協定,套件名稱dovecot

  • SMTP Server

    安裝 # yum install -y postfix
    開機時啟動 # chkconfig postfix on
    啟動服務 # service postfix start
    防火牆 # iptables -I INPUT -p tcp --dport 25 -j ACCEPT
    修改postfix的組態檔 # vim /etc/postfix/main.cf
     myhostname = postfix149.example.com  //完整的FQDN
     mydomain = example.com
     myorigin = $myhostname
     inet_interfaces = all       //記得註解inet_interfaces = localhost
     mynetworks = 140.112.xxx.xxx/25, 127.0.0.0/8

    # service postfix restart

    測試服務是否開啟 # telnet 140.112.xxx.xxx 25
     Trying 140.112.xxx.xxx...
     Connected to 140.112.xxx.xxx.
     Escape character is '^]'.
     220 postfix149.example.com ESMTP Postfix

    # telnet postfix149.example.com 25
     Trying 140.112.xxx.xxx...
     Connected to postfix149.example.com.
     Escape character is '^]'.
     220 postfix149.example.com ESMTP Postfix

    寄信測試 # mail -s "postfix_test" aaa@bbb.ccc
    這是測試信
    .   //『.』是結束符號
    EOT

    Samba 伺服器-網頁式管理畫面

    套件名稱 samba-swat,通訊埠為 901
    登入網址:
    http://127.0.0.1:901/
    http://localhost:901/
    http://[::1]:901/  // IPv6

    安裝 SWAT
    # yum install -y samba-swat
    開機時啟動
    # chkconfig swat on
    登入管理畫面 http://127.0.0.1:901,帳號為 root


    從其他 IP 位址無法登入,因為 SWAT 的組態檔設定只允許 127.0.0.1 登入,註解後即可從其他 IP 位址登入
    # vim /etc/xinetd.d/swat
     service swat
     {
      disable = no
      port = 901
      socket_type = stream
      wait = no
      # only_from = 127.0.0.1
      user = root
      server = /usr/sbin/swat
      log_on_failure += USERID
     }

    # srvice xinetd restart

    Web 伺服器(第一版-續)-Name-based Virtual Host

    此篇文章是將Virtual Hosts的設定寫成conf組態檔,儲存在/etc/httpd/conf.d路徑下,Apache啟動時會自動載入,和C語言載入函數庫觀念相同,可減少主程式碼的長度。
    伺服器-Name-based Virtual Host

    將/etc/httpd/conf/httpd.conf的VirtualHost相關設定移動/etc/httpd/conf.d/vhost.conf 編輯 Apache 組態檔
    # vim /etc/httpd/conf.d/vhost.conf
     NameVirtualHost *:80

     <VirtualHost *:80>  // 此區塊設定可以省略
       DocumentRoot /var/www/html
       ServerName apacheserver139.example.com
     </VirtualHost>

     <VirtualHost *:80>
       DocumentRoot /var/www/vhost
       ServerName vhostapacheserver139.example.com
     </VirtualHost>

     <VirtualHost *:80>
       DocumentRoot /var/www/svhost
       ServerName secretapacheserver139.example.com
       <Directory /var/www/svhost>
          AuthName "Secret Hideout"
          AuthType basic  // 傳輸過程不加密,因此最好搭配 ssl 才安全。
          AuthUserFile /var/www/svhost/users
          require valid-user
       </Directory>
     </VirtualHost>

    重啟 Apache
    # service httpd restart

    Web 伺服器(第一版)-Name-based Virtual Host

    Web伺服器基礎文章:Web 伺服器-Apache
    本篇文章延伸主題:Web 伺服器(第一版 - 續)-Name-based Virtual Host
    20121217內容修訂

    Virtual Host 分成以下兩種
    1. Name-based Virtual Hosts:網頁伺服器架設多個網站,但屬於同一個 IP 位址
    2. IP-based Virtual Hosts:網頁伺服器架設多個網站,而每個網站都有屬於自己的 IP 位址
    範例:架設三個網站,但用同一個 IP 位址。
    Server(10.10.10.139)
    Client(10.10.10.140)

    規劃網站:
    第一個網站:
  • 路徑:/var/www/html
  • 首面內容:apacheserver139.example.com
  • # echo "apacheserver139.example.com" > /var/www/html/index.html
    第二個網站:
  • 路徑:/var/www/vhost
  • 首面內容:vhostapacheserver139.example.com
  • # mkdir /var/www/vhost
    # ll -dZ /var/www/vhost/
     drwxr-xr-x. root root unconfined_u:object_r:httpd_sys_content_t:s0 /var/www/vhost/
    # echo "vhostapacheserver139.example.com" > /var/www/vhost/index.html
    注意:因為資料夾 vhost 是以管理者身份在路徑 /var/www 底下產生的,所以 SELinux context types 是 httpd_sys_content_t,如果是在別的路徑,就要改變 SELinux context 否則無法存取首頁。指令請看 Troubleshootingbr />

    第三個網站:需輸入帳密才能存取
  • 路徑:/var/www/svhost
  • 首面內容:secretapacheserver.example.com
  • # mkdir /var/www/svhost
    # echo "secretapacheserver139.example.com" > /var/www/vhost/private/index.html

    編輯 Apache 組態檔
    # vim /etc/httpd/conf/httpd.conf
     NameVirtualHost *:80

     <VirtualHost *:80>  // 此區塊設定可以省略
       DocumentRoot /var/www/html
       ServerName apacheserver139.example.com
     </VirtualHost>

     <VirtualHost *:80>
       DocumentRoot /var/www/vhost
       ServerName vhostapacheserver139.example.com
     </VirtualHost>

     <VirtualHost *:80>
       DocumentRoot /var/www/svhost
       ServerName secretapacheserver139.example.com
       <Directory /var/www/svhost>
          AuthName "Secret Hideout"
          AuthType basic  // 傳輸過程不加密,因此最好搭配 ssl 才安全。
          AuthUserFile /var/www/svhost/users
          require valid-user
       </Directory>
     </VirtualHost>

    測試組態檔語法是否正確 # service httpd configtest  // 使用httpd -t亦可
     Syntax OK

    為第三個網站產生私有區域的帳密 # htpasswd -cm /var/www/svhost/users privateuser
     New password: 1
     Re-type new password: 1
     Adding password for user privateuser

    重啟 Apache
    # service httpd restart

    客戶端測試

    在沒有架設 DNS 伺服器時,可以編輯 /etc/hosts 組態檔,讓瀏覽器知道網址所對應的 IP 位址
    # vim /etc/hosts
     127.0.0.1  localhost localhost.localdomain localhost4 localhost4.localdomain4
     ::1     localhost localhost.localdomain localhost6 localhost6.localdomain6
     10.10.10.139 apacheserver139.example.com
     10.10.10.139 vhostapacheserver139.example.com
     10.10.10.139 secrteapacheserver139.example.com

    第一及第二網站存取測試:


    第三網站存取測試:


    Troubleshooting

    提供 2 種變更 SELinux types 指令 # chcon -Rt httpd_sys_content_t /another_path  // 參數『R』是將路徑下的所有資料也一併變更
    # chcon -R --reference /var/www/html /another_path  // 參考 /var/www/html 的 SELinux context type

    Samba 伺服器(第二版)

    原始文章:Samba 伺服器

    微軟的網路芳鄰檔案系統為 CIFS(Common Internet File System),若想讓 Unix-Like 主機加入微軟的網路芳鄰並共享資源時,就必須架設 Samba Server,目的就是要讓微軟的使用者在網路芳鄰中看到這台主機的 NetBIOS name,進而存取共享的資源。

    以下範例需要認證才能登入共享資料夾
    安裝 Samba Server(10.10.10.137)
    # yum install -y samba(samba-client cifs-utils) 註:
  • samba-client 套件:smbclient 指令查詢伺服器所分享的資訊,可選擇性安裝,若對自己的伺服器設定有把握的話
  • cifs-utils 套件:網路芳鄰檔案系統格式,沒有安裝就無法掛載,錯誤訊息請看 Troubleshooting
  • 以上兩個套件在客戶端都必須安裝

    開機時啟動
    # chkconfig nmb on ; chkconfig smb on
    開啟防火牆
    # iptables -I INPUT -p udp --dport 137:138 -j ACCEPT
    # iptables -I INPUT -p tcp --dport 139 -j ACCEPT
    # iptables -I INPUT -p tcp --dport 445 -j ACCEPT
    # service iptables save
    # iptables -L -n | grep --color -Ew '13[789]|445'


    設定共享資料及存取權限,組態檔 /etc/samba/smb.conf
    # groupadd -r sambauser
    # mkdir -p /sharedir/santana      // 建立共享資料夾
    # chgrp sambauser /sharedir/santana  // 變更共享資料夾群組
    # chmod 2775 /sharedir/santana    // 變更共享資料夾權限
    # chcon -t samba_share_t /sharedir/santana  // SELinux 設定
    # vim /etc/samba/smb.confg
     [global]
     workgroup = career
     security = usr        // share 不需要認證,user 需要認證
     passdb backend = tdbsam  // 檔案是 passdb.tdb
     ; hosts allow = 127. 192.168.0  // 先用分號註解。

     [santana]  // 共享目錄名稱,使用 smbclient 查詢時所顯示的共享資料夾名稱
     path = /sharedir/santana
     write list = @sambauser
     writeable = yes
     public = no
     browseable = yes
     ; hosts allow = 127. 192.168.0  // 先用分號註解。
    注意:
    hosts allow 放在 global 區段和一般共享資料夾設定區段內,會有不同的訊息
    但相同的是都無法存取
  • global 區段:除了允許的網段外,其餘的主機用 smbclient 也看不到分享資 訊,錯誤訊息請看 Troubleshooting 2
  • 一般共享資料夾設定區段:除了允許的網段外,其餘主機用 smbclient 看得到分享資訊,但不能存取或掛載,錯誤訊息請看 Troubleshooting 3

  • 使用 testparm 測試 /etc/samba/smb.conf 語法是否正確。
    # testparm  // 自動載入 /etc/samba/smb.conf

    新增 3 個 Samba 使用者,待會做測試用。
  • 『sabmauser』,群組為『sabmauser』,密碼為『1』
  • 『sabmauser2』,群組不是『sabmauser』,密碼為『1』
  • 『sabmauser3』,群組為『sabmauser』,密碼為『1』
  • # useradd -s /sbin/nologin sambauser
    # smbpasswd -a sambauser
     New SMB password: 『1』
     Retype new SMB password: 『1』
     Added user sambauser.
    # useradd -s /sbin/nologin sambauser2
    # smbpasswd -a sambauser2
     New SMB password: 『1』
     Retype new SMB password: 『1』
     Added user sambauser2.
    # useradd -s /sbin/nologin -G sambauser sambauser3
    # smbpasswd -a sambauser3
     New SMB password: 『1』
     Retype new SMB password: 『1』
     Added user sambauser3.

    查詢 samba 使用者資料庫
    # pdbedit -L
     sambauser:502:  // 查看 samba 使用者是否已建立
     sambauser2:503:
     sambauser3:504:

    啟動服務
    # service nmb start ; service smb start

    Linux 平台測試(10.10.10.138)

    安裝 Samba Client 套件
    # yum install -y samba-client cifs-utils
    查看 Samba Server 共享資源訊息
    # smbclient -L 10.10.10.137

    存取共享目錄,但無法支援許多常用的指令,故建議掛載以方便進行操作。
    # smbclient //10.10.10.137/santana -U sambauser%1  // santana 是共享資料夾的設定名稱 [santana]

    手動掛載,順便測試 sambauser、sambauser2 及 sambauser3 存取狀態。
    # mkdir /mnt/smb
    # mount //10.10.10.137/santana /mnt/smb -o username=sambauser%1
    # df
    # touch i.am.sambauser.txt
    # mount //10.10.10.137/santana /mnt/smb -o username=sambauser2%1
    # mount //10.10.10.137/santana /mnt/smb -o username=sambauser3%1
    # df
    # touch i.am.sambauser3.txt
    # ll /mnt/smb


    注意!雖然可以用不同帳號同時掛載,但新增檔案所屬為最後掛載的使用者,而為何 sambauser2 會掛載失敗,因為在 smb.conf 的設定,是只有 sambauser 群組,才能存取。

    開機時掛載
    # chkconfig netfs on
    # service netfs start
    # echo '//10.10.10.137/santana /mnt/smb cifs username=sambauser%1 0 0' >> /etc/fstab
    # mount -a

    Troubleshooting

    無法掛載訊息
    # mount //10.10.10.137/share_samba /mnt/samba/ -o username=sambauser%1
     mount: block device //10.10.10.137/share_samba is write-protected, mounting read-only
     mount: cannot mount block device //10.10.10.137/share_samba read-only

    查詢系統記錄
    # tail messages
     Oct 17 22:24:08 sambaserver137 kernel: CIFS VFS: cifs_mount failed w/return code = -13
     Oct 17 22:24:16 sambaserver137 tpvmlpd2[2886]: device type not supported
     Oct 17 22:24:16 sambaserver137 tpvmlpd2[1895]: aborting
     Oct 17 22:24:24 sambaserver137 kernel: CIFS VFS: cifs_mount failed w/return code = -22
     Oct 17 22:24:28 sambaserver137 kernel: Status code returned 0xc000006d NT_STATUS_LOGON_FAILURE
     Oct 17 22:24:28 sambaserver137 kernel: CIFS VFS: Send error in SessSetup = -13
     Oct 17 22:24:28 sambaserver137 kernel: CIFS VFS: cifs_mount failed w/return code = -13
     Oct 17 22:24:28 sambaserver137 kernel: Status code returned 0xc000006d NT_STATUS_LOGON_FAILURE
     Oct 17 22:24:28 sambaserver137 kernel: CIFS VFS: Send error in SessSetup = -13
     Oct 17 22:24:28 sambaserver137 kernel: CIFS VFS: cifs_mount failed w/return code = -13

    安裝 cifs-utils 套件,讓系統能辨視裝置格式
    # yum install -y cifs-utils.x86_64

    Troubleshooting 2

    hosts allow 設定在 global 區段
    # smbclient -L 10.10.10.137
     Enter root's password:
     protocol negotiation failed: NT_STATUS_INVALID_NETWORK_RESPONSE

    Troubleshooting 3

    hosts allow 設定在一般共享資料夾區段