顯示具有 LINUX-SAMBA 標籤的文章。 顯示所有文章

Samba 伺服器(第三版)

Samba 伺服器(第三版)修正了一些步驟並增加了觀念,但也簡化了內容,建議從舊版看起,可以了解作者遇到的問題和觀念的修正。

原始文章:Samba 伺服器(第二版)

微軟的網路芳鄰檔案系統為 CIFS(Common Internet File System),若想讓 Unix-Like 主機加入微軟的網路芳鄰並共享資源時,就必須架設 Samba Server,目的就是要讓微軟的使用者在網路芳鄰中看到這台主機的 NetBIOS name,進而存取共享的資源。


以下的示範,將分為二部份:
  1. 建立一個共享資料夾為 share(/srv/share),不必驗證即可登入與上傳
  2. 建立一個共享資料夾為 mygroup(/srv/mygroup),必須使用者驗證成功後,才可登入與上傳
安裝 Samba 伺服器(10.10.10.137) # yum install -y samba samba-client samba-common cifs-utils
開機時啟動 # chkconfig nmb on ; chkconfig smb on
開啟防火牆
# iptables -A INPUT -i eth0 -p tcp -m tcp --dport 21 -m state --state NEW -j ACCEPT
# iptables -A INPUT -i eth0 -p tcp -m state --state RELATED,ESTABLISHED -j ACCEPT
# iptables -I INPUT -i eth0 -p udp --dport 137:138 -m state --state NEW -j ACCEPT
# iptables -I INPUT -i eth0 -p tcp -m multiport --dport 139,445 -m state --state NEW -j ACCEPT
# service iptables save
# iptables -L -n | grep --color -Ew '13[789]|445'


Part1:建立一個共享資料夾為 share(/srv/share),不必驗證即可登入與上傳,編輯設定檔 /etc/samba/smb.conf

# mkdir /srv/share   // 建立共享資料夾
# chmod 2777 /srv/share  // 變更共享資料夾權限
# ll -dZ /srv/share  // SELinux 設定
 drwxrwsr-x. root root unconfined_u:object_r:var_t:s0 /srv/share
# chcon -t samba_share_t /srv/share
# ll -dZ /srv/share
 drwxrwsr-x. root root unconfined_u:object_r:samba_share_t:s0 /srv/share

# vim /etc/samba/smb.conf
 [global]
 workgroup = career
 security = usr
 passdb backend = tdbsam  // 檔案是 passdb.tdb

 [share]  // 共享目錄名稱,使用 smbclient 查詢時所顯示的共享資料夾名稱
 path = /srv/share
 guest ok = yes
 guest only = yes
 read only = no  // 同等於 writeable = yes

使用 testparm 測試 /etc/samba/smb.conf 語法是否正確。 # testparm  // 自動載入 /etc/samba/smb.conf;參數 -v 詳細列出
啟動服務 # service nmb start; service smb start
Samba 客戶端(10.10.10.129)測試
  1. 找出目前網域上的 Workgroup
  2. # nmblookup -A 10.10.10.160  // 亦可用主機名稱

  3. 查詢分享資源
  4. # smbclient -L 10.10.10.160  // 亦可用主機名稱

  5. 登入 samba 伺服器,並上傳資料到 /srv/share
  6. # smbclient //10.10.10.160/share
     Enter root's password: 直接按 Enter 進入
     Anonymous login successful
     Domain=[CAREER] OS=[Unix] Server=[Samba 3.5.10-125.el6]
    smb: \> put install.log
     putting file install.log as \install.log (9833.5 kb/s) (average 9833.7 kb/s)

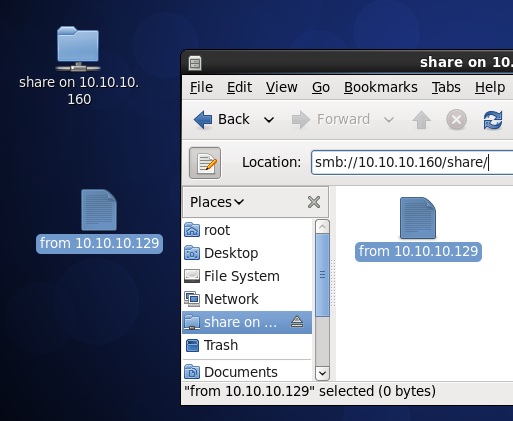
  7. 使用檔案總管 nautilus 登入並上傳
  8. # nautilus &

Part2:建立一個共享資料夾為 mygroup(/srv/mygroup),必須使用者驗證成功後,才可登入與上傳,編輯設定檔 /etc/samba/smb.conf

# useradd guest2  // 新增使用者guest2,當他登入/srv/mygroup時,是被目錄的安全性拒絕,而不是samba伺服器。
# passwd guest2
# groupadd -g 8000 sambauser
# mkdir /srv/mygroup       // 建立共享資料夾
# chgrp sambauser /srv/mygroup   // 變更共享資料夾群組
# chmod 2777 /srv/mygroup    // 變更共享資料夾權限
# chcon -t samba_share_t /srv/mygroup  // SELinux 設定

# vim /etc/samba/smb.conf
 [global]
 workgroup = career
 security = usr
 passdb backend = tdbsam  // 檔案是 passdb.tdb

 [share]  // 共享目錄名稱,使用 smbclient 查詢時所顯示的共享資料夾名稱
 path = /srv/share
 guest ok = yes
 guest only = yes
 read only = no  // 同等於 writeable = yes

 [members]  // 共享目錄名稱,使用 smbclient 查詢時所顯示的共享資料夾名稱
 path = /srv/mygroup
 guest ok = no
 guest only = no
 read only = no  // 同等於 writeable = yes
 vaild users = @sambauser  // 允許群組成員存取
 invaild users = guest  // 拒絕使用者guest存取

samba使用者條件:
  1. 必須為Linux用戶
  2. 使用smbpasswd建立登入密碼,注意!使用者的samba密碼與系統登入密碼是不相同的。
新增 Samba 使用者
  • 『user』,群組為『sabmauser』,密碼為『1』
  • 『guest』,群組為『sabmauser』,密碼為『1』
  • 『guest2』,不屬於群組『sabmauser』,密碼為『1』
  • # useradd -G 8000 -s /sbin/nologin user
    # smbpasswd -a sambauser1
     New SMB password: 『1』
     Retype new SMB password: 『1』
     Added user sambauser.

    # useradd -G 8000 -s /sbin/nologin guest # smbpasswd -a guest
     New SMB password: 『1』
     Retype new SMB password: 『1』
     Added user sambauser2.

    # useradd -s /sbin/nologin guest2 # smbpasswd -a guest2
     New SMB password: 『1』
     Retype new SMB password: 『1』
     Added user sambauser2.

    查詢 samba 使用者資料庫 # pdbedit -L  // 查看 samba 使用者是否已建立;-v詳細模式
     user:505:
     guest:500:guest
     guest2:504:

    啟動服務
    # service smb start
    Samba 客戶端(10.10.10.129)測試 登入 samba 伺服器 # smbclient //10.10.10.160/members -U user
     Enter user's password:
     Domain=[CAREER] OS=[Unix] Server=[Samba 3.5.10-125.el6]
     smb: \> exit

    # smbclient //10.10.10.160/members -U guest
     Enter guest's password:
     Domain=[CAREER] OS=[Unix] Server=[Samba 3.5.10-125.el6]
     tree connect failed: NT_STATUS_ACCESS_DENIED  // 此連線是被samba伺服器拒絕

    # smbclient //10.10.10.160/members -U guest2
     Enter guest2's password:
     Domain=[CAREER] OS=[Unix] Server=[Samba 3.5.10-125.el6]
     tree connect failed: NT_STATUS_ACCESS_DENIED  // 此連線是被目錄拒絕

    Samba 伺服器-網頁式管理畫面

    套件名稱 samba-swat,通訊埠為 901
    登入網址:
    http://127.0.0.1:901/
    http://localhost:901/
    http://[::1]:901/  // IPv6

    安裝 SWAT
    # yum install -y samba-swat
    開機時啟動
    # chkconfig swat on
    登入管理畫面 http://127.0.0.1:901,帳號為 root


    從其他 IP 位址無法登入,因為 SWAT 的組態檔設定只允許 127.0.0.1 登入,註解後即可從其他 IP 位址登入
    # vim /etc/xinetd.d/swat
     service swat
     {
      disable = no
      port = 901
      socket_type = stream
      wait = no
      # only_from = 127.0.0.1
      user = root
      server = /usr/sbin/swat
      log_on_failure += USERID
     }

    # srvice xinetd restart

    Samba 伺服器(第二版)

    原始文章:Samba 伺服器

    微軟的網路芳鄰檔案系統為 CIFS(Common Internet File System),若想讓 Unix-Like 主機加入微軟的網路芳鄰並共享資源時,就必須架設 Samba Server,目的就是要讓微軟的使用者在網路芳鄰中看到這台主機的 NetBIOS name,進而存取共享的資源。

    以下範例需要認證才能登入共享資料夾
    安裝 Samba Server(10.10.10.137)
    # yum install -y samba(samba-client cifs-utils) 註:
  • samba-client 套件:smbclient 指令查詢伺服器所分享的資訊,可選擇性安裝,若對自己的伺服器設定有把握的話
  • cifs-utils 套件:網路芳鄰檔案系統格式,沒有安裝就無法掛載,錯誤訊息請看 Troubleshooting
  • 以上兩個套件在客戶端都必須安裝

    開機時啟動
    # chkconfig nmb on ; chkconfig smb on
    開啟防火牆
    # iptables -I INPUT -p udp --dport 137:138 -j ACCEPT
    # iptables -I INPUT -p tcp --dport 139 -j ACCEPT
    # iptables -I INPUT -p tcp --dport 445 -j ACCEPT
    # service iptables save
    # iptables -L -n | grep --color -Ew '13[789]|445'


    設定共享資料及存取權限,組態檔 /etc/samba/smb.conf
    # groupadd -r sambauser
    # mkdir -p /sharedir/santana      // 建立共享資料夾
    # chgrp sambauser /sharedir/santana  // 變更共享資料夾群組
    # chmod 2775 /sharedir/santana    // 變更共享資料夾權限
    # chcon -t samba_share_t /sharedir/santana  // SELinux 設定
    # vim /etc/samba/smb.confg
     [global]
     workgroup = career
     security = usr        // share 不需要認證,user 需要認證
     passdb backend = tdbsam  // 檔案是 passdb.tdb
     ; hosts allow = 127. 192.168.0  // 先用分號註解。

     [santana]  // 共享目錄名稱,使用 smbclient 查詢時所顯示的共享資料夾名稱
     path = /sharedir/santana
     write list = @sambauser
     writeable = yes
     public = no
     browseable = yes
     ; hosts allow = 127. 192.168.0  // 先用分號註解。
    注意:
    hosts allow 放在 global 區段和一般共享資料夾設定區段內,會有不同的訊息
    但相同的是都無法存取
  • global 區段:除了允許的網段外,其餘的主機用 smbclient 也看不到分享資 訊,錯誤訊息請看 Troubleshooting 2
  • 一般共享資料夾設定區段:除了允許的網段外,其餘主機用 smbclient 看得到分享資訊,但不能存取或掛載,錯誤訊息請看 Troubleshooting 3

  • 使用 testparm 測試 /etc/samba/smb.conf 語法是否正確。
    # testparm  // 自動載入 /etc/samba/smb.conf

    新增 3 個 Samba 使用者,待會做測試用。
  • 『sabmauser』,群組為『sabmauser』,密碼為『1』
  • 『sabmauser2』,群組不是『sabmauser』,密碼為『1』
  • 『sabmauser3』,群組為『sabmauser』,密碼為『1』
  • # useradd -s /sbin/nologin sambauser
    # smbpasswd -a sambauser
     New SMB password: 『1』
     Retype new SMB password: 『1』
     Added user sambauser.
    # useradd -s /sbin/nologin sambauser2
    # smbpasswd -a sambauser2
     New SMB password: 『1』
     Retype new SMB password: 『1』
     Added user sambauser2.
    # useradd -s /sbin/nologin -G sambauser sambauser3
    # smbpasswd -a sambauser3
     New SMB password: 『1』
     Retype new SMB password: 『1』
     Added user sambauser3.

    查詢 samba 使用者資料庫
    # pdbedit -L
     sambauser:502:  // 查看 samba 使用者是否已建立
     sambauser2:503:
     sambauser3:504:

    啟動服務
    # service nmb start ; service smb start

    Linux 平台測試(10.10.10.138)

    安裝 Samba Client 套件
    # yum install -y samba-client cifs-utils
    查看 Samba Server 共享資源訊息
    # smbclient -L 10.10.10.137

    存取共享目錄,但無法支援許多常用的指令,故建議掛載以方便進行操作。
    # smbclient //10.10.10.137/santana -U sambauser%1  // santana 是共享資料夾的設定名稱 [santana]

    手動掛載,順便測試 sambauser、sambauser2 及 sambauser3 存取狀態。
    # mkdir /mnt/smb
    # mount //10.10.10.137/santana /mnt/smb -o username=sambauser%1
    # df
    # touch i.am.sambauser.txt
    # mount //10.10.10.137/santana /mnt/smb -o username=sambauser2%1
    # mount //10.10.10.137/santana /mnt/smb -o username=sambauser3%1
    # df
    # touch i.am.sambauser3.txt
    # ll /mnt/smb


    注意!雖然可以用不同帳號同時掛載,但新增檔案所屬為最後掛載的使用者,而為何 sambauser2 會掛載失敗,因為在 smb.conf 的設定,是只有 sambauser 群組,才能存取。

    開機時掛載
    # chkconfig netfs on
    # service netfs start
    # echo '//10.10.10.137/santana /mnt/smb cifs username=sambauser%1 0 0' >> /etc/fstab
    # mount -a

    Troubleshooting

    無法掛載訊息
    # mount //10.10.10.137/share_samba /mnt/samba/ -o username=sambauser%1
     mount: block device //10.10.10.137/share_samba is write-protected, mounting read-only
     mount: cannot mount block device //10.10.10.137/share_samba read-only

    查詢系統記錄
    # tail messages
     Oct 17 22:24:08 sambaserver137 kernel: CIFS VFS: cifs_mount failed w/return code = -13
     Oct 17 22:24:16 sambaserver137 tpvmlpd2[2886]: device type not supported
     Oct 17 22:24:16 sambaserver137 tpvmlpd2[1895]: aborting
     Oct 17 22:24:24 sambaserver137 kernel: CIFS VFS: cifs_mount failed w/return code = -22
     Oct 17 22:24:28 sambaserver137 kernel: Status code returned 0xc000006d NT_STATUS_LOGON_FAILURE
     Oct 17 22:24:28 sambaserver137 kernel: CIFS VFS: Send error in SessSetup = -13
     Oct 17 22:24:28 sambaserver137 kernel: CIFS VFS: cifs_mount failed w/return code = -13
     Oct 17 22:24:28 sambaserver137 kernel: Status code returned 0xc000006d NT_STATUS_LOGON_FAILURE
     Oct 17 22:24:28 sambaserver137 kernel: CIFS VFS: Send error in SessSetup = -13
     Oct 17 22:24:28 sambaserver137 kernel: CIFS VFS: cifs_mount failed w/return code = -13

    安裝 cifs-utils 套件,讓系統能辨視裝置格式
    # yum install -y cifs-utils.x86_64

    Troubleshooting 2

    hosts allow 設定在 global 區段
    # smbclient -L 10.10.10.137
     Enter root's password:
     protocol negotiation failed: NT_STATUS_INVALID_NETWORK_RESPONSE

    Troubleshooting 3

    hosts allow 設定在一般共享資料夾區段

    Samba 伺服器

    微軟的網路芳鄰檔案系統為 CIFS(Common Internet File System),若想讓 Unix-Like 主機加入微軟的網路芳鄰並並享資源時,就必須架設 Samba Server,目的就是要讓微軟的使用者在網路芳鄰中看到這台主機的 NetBIOS name,進而存取享的資源。

    以下範例需要認證才能登入共享資料夾
    安裝 Samba Server
    # yum install -y samba
    開機時啟動
    # chkconfig nmb on  // 提供 NetBIOS 名稱解析
    # chkconfig smb on  // 提供檔案共享及列印服務

    開啟防火牆,nmbd 通訊埠為 137(udp)、138(udp),smbd 通訊埠為 139(tcp)、445(tcp)
    # iptables -I INPUT -p udp --dport 137:138 -j ACCEPT
    # iptables -I INPUT -p tcp --dport 139 -j ACCEPT
    # iptables -I INPUT -p tcp --dport 445 -j ACCEPT
    # service iptables save

    設定共享資料及存取權限,組態檔 /etc/samba/smb.conf
    # mkdir /sharedir  // 建立共享資料夾
    # chcon -t samba_share_t /sharedir  // SELinux設定
    # vim /etc/samba/smb.confg
     [global]
     workgroup = career
     netbios name = santanalee
     security = usr  //share 不需要認證,user 需要認證
     passdb backend = tdbsam  // 檔案是 passdb.tdb

     [share_samba]  // 共享目錄名稱
     path = /sharedir
     valid users = sambauser
     writeable = yes
     public = no
     browseable = yes  // 若設定為no,但如果登入者知道完整路徑仍可存取。
     available = yes  // 此區段設定是否動作,預設是yes,可以不用輸入

    使用 testparm 測試 /etc/samba/smb.conf 語法是否正確。
    故意在組態檔內寫入一個錯誤參數名稱 printers。
    # testparm  // 自動載入 /etc/samba/smb.conf
     Load smb config files from /etc/samba/smb.conf
     rlimit_max: increasing rlimit_max (1024) to minimum Windows limit (16384)
     Processing section "[homes]"
     Processing section "[printers]"
     Unknown parameter encountered: "aprintable"
     Ignoring unknown parameter "aprintable"
     WARNING: [printers] service MUST be printable!
     Loaded services file OK.
     Server role: ROLE_STANDALONE
     Press enter to see a dump of your service definitions

    新增 Samba 使用者『sabmauser』,密碼為『1』
    # useradd -s /sbin/nologin sambauser
    # smbpasswd -a sambauser
     New SMB password: 『1』
     Retype new SMB password: 『1』
     Added user sambauser.

    查詢 samba 使用者資料庫
    # pdbedit -L
     sambauser:502:

    啟動服務
    # service nmb start ; service smb start

    Windows 平台測試

    1. 打開網路芳鄰,可以看到 NetBIOS Name 為 SANTANALEE 的主機


    2. 進入主機要輸入帳/密 (sambauser/1)


    3. 登入後可看見共享目錄 share_samba 及使用者家目錄


    4. 登入使用者家目錄遭系統拒絕,是因為 SELinux 關係

    5. 設定 SELinux 布林值
      # setsebool -P samba_enable_home_dirs 1

    Linux 平台測試

    安裝 Samba Client 套件
    # yum install -y samba-client
    查看 Samba Server 共享資源訊息
    # smbclient -L 10.10.10.137

    存取共享目錄,但無法支援許多常用的指令,故建議掛載以方便進行操作。
    # smbclient //10.10.10.137/share_samba -U sambauser%1
     // 可使用 NetBIOS Name 或 IP 位址,另外 sambauser%1 的寫法,密碼會留在歷史資料內,不加 %1 系統會出現提示輸入訊息。


    手動掛載
    # mkdir /mnt/smb
    # mount(-t cifs)//10.10.10.137/share_samba /mnt/smb -o username=sambauser%1  // 檔案系統參數可以不用下
    # df


    開機時掛載
    # chkconfig netfs on
    # service netfs start
    # echo '//10.10.10.137/share_samba /mnt/smb cifs username=sambauser%1 0 0' >> /etc/fstab
    # mount -a