# du -sk -h /User/Ryan/* //查詢Ryan路徑下所有子資料夾大小
查詢MAC AIR 資料夾大小
最近同事的MAC AIR速度超慢,看了一下硬碟大小,剩餘幾百MB,故使用指令找出是那些資料佔用了空間,讓同事自行決定是否刪除。

重置MySQL管理者密碼
忘記root密碼怎麼辦?以下的方法幫你重新設定密碼。
# mysql -u root -p

Enter password:

ERROR 1045 (28000): Access denied for user 'root'@'localhost' (using password: YES)


# service mysqld stop //停止服務

# mysqld_safe --user=mysql --skip-grant-tables --skip-networking& //在安全模式下執行

# mysql -u root mysql

mysql> UPDATE user SET Password=PASSWORD('輸入新密碼')where USER='root';

      Query OK, 0 rows affected (0.01 sec)

      Rows matched: 3  Changed: 0  Warnings: 0


mysql> FLUSH PRIVILEGES;

      Query OK, 0 rows affected (0.00 sec)


mysql> quit

      Bye


# mysql -u root -p

Enter password:

mysql>
lua安裝錯誤訊息解決方法
錯誤訊息:
lua.c:67:31: error: readline/readline.h: No such file or directory
lua.c:68:30: error: readline/history.h: No such file or directory
lua.c:67:31: error: readline/readline.h: No such file or directory
lua.c:68:30: error: readline/history.h: No such file or directory
#yum install -y readline-devel ncurses-devel
wget及curl指令下載檔案
wget用法
# wget -P /root/Desktop ftp://gnu.mirror.iweb.com/gcc/gcc-4.8.2/gcc-4.8.2.tar.gz //參數-p:儲存到指定的目錄

  --2014-03-20 22:30:11--  ftp://gnu.mirror.iweb.com/gcc/gcc-4.8.2/gcc-4.8.2.tar.gz

    => “/root/Desktop/gcc-4.8.2.tar.gz”

  Resolving gnu.mirror.iweb.com... 70.38.0.144, 2607:f748:10:12::6:1

  Connecting to gnu.mirror.iweb.com|70.38.0.144|:21... connected.

  Logging in as anonymous ... Logged in!

  ==> SYST ... done.    ==> PWD ... done.

  ==> TYPE I ... done.  ==> CWD (1) /gcc/gcc-4.8.2 ... done.

  ==> SIZE gcc-4.8.2.tar.gz ... 110513936

  ==> PASV ... done.    ==> RETR gcc-4.8.2.tar.gz ... done.

  Length: 110513936 (105M) (unauthoritative)


28% [================>                ] 31,242,540   297K/s  eta 4m 56s
curl用法
# curl -R -O ftp://gnu.mirror.iweb.com/gcc/gcc-4.8.2/gcc-4.8.2.tar.gz

 % Total    % Received % Xferd  Average Speed   Time    Time     Time  Current

                        Dload  Upload   Total   Spent    Left  Speed

 3 105M    3 3310k   0   0  191k      0  0:09:23  0:00:17  0:09:06  312k


參數-O:使用伺服器上的檔案名,存在本地。

參數-R:在本地生成文件時,使用遠端的時間郵戳(timestamp)。
Crontab以秒數為單位執行的方式
Crontab最小單位為每分鐘,所以如果想要以秒數為最小單位來定時執行指令就必需加上其他的指令來完成。
sleep NUMBER[SUFFIX]...
SUFFIX may be ‘s’ for seconds (the default), ‘m’ for minutes, ‘h’ for hours or ‘d’ for days.
nohup COMMAND [ARG]...
nohup - run a command immune to hangups, with output to a non-tty //忽略SIGHUP信號,登出後指令執行不中斷
sleep指令介紹
SYNOPSISsleep NUMBER[SUFFIX]...
SUFFIX may be ‘s’ for seconds (the default), ‘m’ for minutes, ‘h’ for hours or ‘d’ for days.
# sleep 2; ls -l //2秒後執行ls指令,如果是2分鐘後則單位要變成2m。
nohup指令介紹
SYNOPSISnohup COMMAND [ARG]...
nohup - run a command immune to hangups, with output to a non-tty //忽略SIGHUP信號,登出後指令執行不中斷
每15秒執行指令
# crontab -e

  * * * * * /bin/sh /root/graduate.sh  //0秒後執行

  * * * * * sleep 15; /bin/sh /root/graduate.sh  //15秒後執行

  * * * * * sleep 30; /bin/sh /root/graduate.sh  //30秒後執行

  * * * * * sleep 45; /bin/sh /root/graduate.sh  //45秒後執行
每1秒執行指令用使用迴圈方式在背景執行
# vim graduate.sh

  #! /bin.sh

  while true; do

  /bin/sleep 1

  /bin/date > time.txt

  done


# nohup graduate.sh &
ThunderBird同步Google Calendar和Task
試用過 Evolution 和 ThunderBird 同步 Google Calendar 後,ThunderBird
因為版面幾乎和 Google Calender 一樣(套件thunderbird-lightning),而且新增或編輯都會同步到Google Calendar。
安裝ThunderBird(除了thunderbird以外,其餘套件要有epel的安裝來源)

因為版面幾乎和 Google Calender 一樣(套件thunderbird-lightning),而且新增或編輯都會同步到Google Calendar。
安裝ThunderBird(除了thunderbird以外,其餘套件要有epel的安裝來源)
# yum install thunderbird thunderbird-lightning mozilla-adblockplus.noarch python-mozrunner.noarch
同步Google Calendar設定
- 到 Google 日曆設定內複製XML格式的私人網址
- 新增行事曆
- 行事曆存取位置
- 外部行事曆來源
- 登入Google帳號
- 日曆名稱及顏色設定
- 完成設定
- 載入後畫面


同步Google Task設定
使用外掛Google Task Sync 0.3.1- 選取命令列Tools → Add-ons
- 搜尋並安裝外掛Google Task Sync 0.3.1
- 重啟Thunderbird
- 登入Gmail帳號
- 完成後畫面


解決管理員無法開啟google日曆錯誤
當我們以管理員執行 google chrome 時,有時候會無法開啟 google 日曆,這是因為 SELinux 的問題,這時候只要變更 content type 就可以執行了。
開啟 google 日曆

測試是否為 SELinux 阻擋?

查看 log 檔內容:檔案 /opt/google-tmp/Default/databases/https_www.google.com_0/1 的 content type 無法取得權限。
變更檔案 /opt/google-tmp/Default/databases/https_www.google.com_0/1 的 content type
註:/opt/google-tmp/ 這個路徑是自行產生的喲!請參考本人文章解除 root 執行 Chrome 限制
開啟 google 日曆
測試是否為 SELinux 阻擋?
# setenforce 0
查看 log 檔內容:檔案 /opt/google-tmp/Default/databases/https_www.google.com_0/1 的 content type 無法取得權限。
# tail -f /var/log/messages

 Dec 10 13:17:00 ktl kernel: type=1400 audit(1355116620.282:130): avc:  denied  { write } for  pid=8137

 comm="Chrome_ChildIOT" path="/opt/google-tmp/Default/databases/https_www.google.com_0/1" dev=sda3

 ino=1706905 scontext=unconfined_u:unconfined_r:chrome_sandbox_t:s0-s0:c0.c1023

 tcontext=unconfined_u:object_r:usr_t:s0 tclass=file
變更檔案 /opt/google-tmp/Default/databases/https_www.google.com_0/1 的 content type
# ll -Z /opt/google-tmp/Default/databases/https_www.google.com_0/1

 -rw-------. root root unconfined_u:object_r:usr_t:s0   /opt/google-tmp/Default/databases/https_www.google.com_0/1

# chcon -t user_tmp_t /opt/google-tmp/Default/databases/https_www.google.com_0/1

# ll -Z /opt/google-tmp/Default/databases/https_www.google.com_0/1

 -rw-------. root root unconfined_u:object_r:user_tmp_t:s0 /opt/google-tmp/Default/databases/

 https_www.google.com_0/1
註:/opt/google-tmp/ 這個路徑是自行產生的喲!請參考本人文章解除 root 執行 Chrome 限制
找回google chrome搜尋舊介面
google 搜尋新介面有夠難用!Orz.....
為了手機和平版做了這樣的改版,用到我快吐血了!
以下的內容教你找回舊愛~~~舊愛還是最美
為了手機和平版做了這樣的改版,用到我快吐血了!
以下的內容教你找回舊愛~~~舊愛還是最美
- 新介面的功能其實和最上面的功能重疊了
- 這其實是一個 Javascript 在搞鬼,關掉他就好了 設定→隱私權說明→內容設定→Javascript→管理例外狀況...
- 舊愛還是最美

在管理例外狀況中,輸入 https://www.google.com.tw


Auto-Unlock Keyring
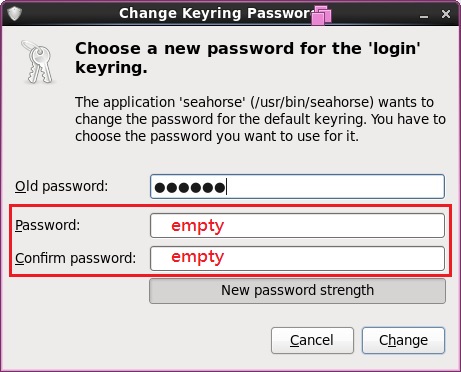
登入無線網路時,都會出現 unlock kerying 的視窗,要求輸入 Keyring 的密碼,非常的討厭。
以下教您如何關閉這個畫面。
以下教您如何關閉這個畫面。
- 開啟 Passwords and Encryption Keys
- 新密碼請保留空白
# seahorse &

雙系統開機設定(Linux+Windows)
想安裝雙系統在筆電或個人電腦上,要謹慎處理 bootloader 的安裝。
假設原作業系統是 windows,安裝新作業系統 Linux 時,若沒有指定 bootloader 安裝的路徑,就會把 windows 的 bootloader 覆蓋,開機後將無法進入 windows。
以下將教您解決雙系統安裝問題,若怕失敗,可先用 VMware Player 實做。
狀況一:假設目前系統是 Windows,要安裝 Linux。
條件:安裝在同一顆硬碟,但不同磁區。
狀況二:windows 的 bootloadr 被覆蓋,無法進入 windows 作業系統。
在gurb.conf加入以下內容
假設原作業系統是 windows,安裝新作業系統 Linux 時,若沒有指定 bootloader 安裝的路徑,就會把 windows 的 bootloader 覆蓋,開機後將無法進入 windows。
以下將教您解決雙系統安裝問題,若怕失敗,可先用 VMware Player 實做。
狀況一:假設目前系統是 Windows,要安裝 Linux。
條件:安裝在同一顆硬碟,但不同磁區。
- 加大虛機的硬碟空間:目前硬碟大小為 80GB,再大到 100GB,多出來的 20GB 就是放至 Linux 作業系統。
- 光碟機載入 ISO 檔
- 進入 BIOS 按 F2 設定開機順序,使用光碟開機(使用加號或減號變更順序)。
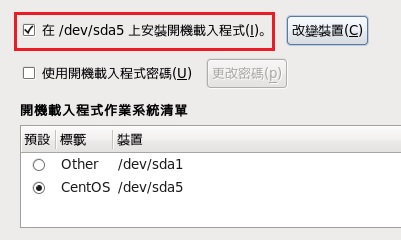
- 設定 bootloader 安裝路徑,安裝在剛剛配置的磁區 sda5。
- 重開機進入 Windows 修改 Windows boot manager,最簡易的方法就是使用 EasyBCD 軟體設定。
- Windows 重開機後畫面




狀況二:windows 的 bootloadr 被覆蓋,無法進入 windows 作業系統。
在gurb.conf加入以下內容
title Windows7

 rootnoverify (hd0,0)  // Windows 是從第一個硬碟的第一個分割區啟動 (hd0,0),而且不檢驗此分割槽

 chainloader +1  // GRUB 載入指定分割區的第一個磁區

 makeactive  // 讓開機區的 boot 項目具有 active 的標誌
解決FirefoxESR無法正常播放壹電視新聞
安裝完flash player後,看youtube或一般的flash都沒有問題,唯獨要看壹電視新聞時,FirefoxESR就會停止運作,變成要強制關閉,這時候在終端機出現了以下的訊息。
關閉FirefoxESR Browser
表示NSPlugin Viewer發生錯誤,所以用yum更新了nsplugin就正常了
*** NSPlugin Viewer  *** WARNING:(../src/npw-viewer.c:1082):invoke_NPN_GetURLNotify: assertion failed: (rpc_method_invoke_possible(g_rpc_connection))

*** NSPlugin Viewer  *** WARNING:(../src/npw-viewer.c:1082):invoke_NPN_GetURLNotify: assertion failed: (rpc_method_invoke_possible(g_rpc_connection))

*** NSPlugin Viewer  *** WARNING:(../src/npw-viewer.c:1082):invoke_NPN_GetURLNotify: assertion failed: (rpc_method_invoke_possible(g_rpc_connection))

*** NSPlugin Viewer  *** WARNING:(../src/npw-viewer.c:1082):invoke_NPN_GetURLNotify: assertion failed: (rpc_method_invoke_possible(g_rpc_connection))

*** NSPlugin Viewer  *** WARNING:(../src/npw-viewer.c:1082):invoke_NPN_GetURLNotify: assertion failed: (rpc_method_invoke_possible(g_rpc_connection))

*** NSPlugin Viewer  *** WARNING:(../src/npw-viewer.c:1082):invoke_NPN_GetURLNotify: assertion failed: (rpc_method_invoke_possible(g_rpc_connection))

*** NSPlugin Viewer  *** WARNING:(../src/npw-viewer.c:1082):invoke_NPN_GetURLNotify: assertion failed: (rpc_method_invoke_possible(g_rpc_connection))
......
關閉FirefoxESR Browser
表示NSPlugin Viewer發生錯誤,所以用yum更新了nsplugin就正常了
# yum search nsplugin

 nspluginwrapper.i686 : A compatibility layer for Netscape 4 plugins

 nspluginwrapper.x86_64 : A compatibility layer for Netscape 4 plugins


#yum install -y nspluginwrapper.x86_64
Broadcom 802.11 BCM43227驅動程式安裝步驟(Linux)
Broadcom Linux 驅動程式載點
找出無線網卡模組編號
安裝 kernel-devel,執行 make 時會用到。
註:若沒有安裝,查看 /lib/modules/$(uname -r)/路徑,發現所需要build還未建立。

下載並解壓縮
找出無線網卡模組編號
# lspci | grep Broadcom

03:00.0 Network controller: Broadcom Corporation BCM43227 802.11b/g/n

04:00.0 Ethernet controller: Broadcom Corporation NetLink BCM57785 Gigabit Ethernet PCIe (rev 10)

04:00.1 SD Host controller: Broadcom Corporation NetXtreme BCM57765 Memory Card Reader (rev 10)

04:00.2 System peripheral: Broadcom Corporation Device 16be (rev 10)

04:00.3 System peripheral: Broadcom Corporation Device 16bf (rev 10)
安裝 kernel-devel,執行 make 時會用到。
# yum install kernel-devel-$(uname -r) kernel-headers

# yum groupinstall "Development Tools"
註:若沒有安裝,查看 /lib/modules/$(uname -r)/路徑,發現所需要build還未建立。
# /lib/modules/$(uname -r)/build/
下載並解壓縮
# mkdir /root/Desktop/broadcom

# cd /root/Desktop/broadcom

# wget http://zh-tw.broadcom.com/docs/linux_sta/hybrid-portsrc_x86_64-v5_100_82_112.tar.gz

# tar -zxvf hybrid-portsrc_x86_64-v5_100_82_112.tar.gz

# make API=WEXT  // WEXT 或 CFG80211

# ll *.ko

 wl.ko

# cp wl.ko /lib/modules/2.6.32-279.el6.x86_64/kernel/net/wireless

# depmod

# modprobe wl

# poweroff
自動掛載-Autofs
通常是搭配 NFS,目的是使用者需要存取 NFS 所分享的資料夾時,系統會自動掛載,不需要使用 mount,也不需要預先建立掛載點,掛載點系統會自動建立,離開分享資料夾,系統也會自動移除掛載點。
範例:

安裝並啟動服務
關閉防火牆(實驗中先關閉防火牆,不然客戶端會被擋,若要設定 NFS 伺服器防火牆,可參考伺服器-NFS)
NFS 伺服器端分享資料夾設定
安裝並啟動服務
查詢遠端主機是否提供 NFS 服務
查詢 NFS 伺服器分享哪些資料夾
自動掛載設定檔(藍色字體為本地端對應目錄架構)
啟動 autofs 服務後,在根目錄下會產生不占空間的 /net 和 /localvar 目錄

進入 NFS 伺服器
補充:產生symbolic link指令
刪除symbolic link指令
範例:
NFS 伺服器(10.10.10.146 )
安裝並啟動服務
# yum install -y nfs-utils rpcbind

# chkconfig nfs on; chkconfig rpcbind on

# service nfs start; service rpcbind start
關閉防火牆(實驗中先關閉防火牆,不然客戶端會被擋,若要設定 NFS 伺服器防火牆,可參考伺服器-NFS)
# service iptables stop
NFS 伺服器端分享資料夾設定
# vim /etc/exports

 /var/ftp/pub *(ro)

 /var/www *(ro)

# exportfs -rv
NFS 客戶端(10.10.10.159 )
安裝並啟動服務
# yum install -y nfs-utils rpcbind autofs

# chkconfig nfs on; chkconfig rpcbind on; chkconfig autofs on

# service nfs start; service rpcbind start; service autofs start
查詢遠端主機是否提供 NFS 服務
# rpcinfo -p 10.10.10.146
查詢 NFS 伺服器分享哪些資料夾
# showmount -e 10.10.10.146

 Export list for 10.10.10.146:

 /var/www     *

 /var/ftp/pub *
自動掛載設定檔(藍色字體為本地端對應目錄架構)
# vim /etc/auto.master

 /localvar /etc/auto.autofs


# vim /etc/auto.autofs

 pub 10.10.10.146:/var/ftp/pub

 www 10.10.10.146:/var/www


# service autofs reload
啟動 autofs 服務後,在根目錄下會產生不占空間的 /net 和 /localvar 目錄
進入 NFS 伺服器
# cd /localvar/  // 尚未掛載

# df


# cd /localvar/www  // 此時就會掛載,若不想每次這樣一層一層的登入可以使用ln產生一個symbolic link。

# df


# cd ..

# pwd

 /localvar

# ll

 total 4

 drwxr-xr-x. 6 root root 4096 Nov 15 10:12 www

# ll  // 離開目錄後,預設300秒後自動卸載(設定檔/etc/sysconfig/autofs)

 total 0
補充:產生symbolic link指令
# ln -s /localvar/www nfs-www

# ll nfs-www

 lrwxrwxrwx. 1 root root 13 Nov 15 16:02 nfs-www -> /localvar/www

# cd nfs-www

# df
刪除symbolic link指令
# rm nfs-www

 rm: remove symbolic link `nfs-www'? y or n
Troubleshooting-空間不足
有時候硬碟空間突然快用完了,到底發生什麼事?
通常多人使用的時候最容易發生,前一個使用者可能放了很大的檔案塞爆了硬碟,這時候身為管理者的你必需要找出這些檔案的位置。
方法一、查看目錄使用空間
方法二、使用 find 指令
通常多人使用的時候最容易發生,前一個使用者可能放了很大的檔案塞爆了硬碟,這時候身為管理者的你必需要找出這些檔案的位置。
方法一、查看目錄使用空間
# du -sh /*
方法二、使用 find 指令
# find / -size +1G // 找大於 1GB 以上的檔案
規劃一般使用者可執行的指令
使用 ACL:假設要限制使用者執行 w 指令
# which w

 /usr/bin/w


# getfacl /usr/bin/w  // 查詢指令 w 的權限

 getfacl: Removing leading '/' from absolute path names

 # file: usr/bin/w

 # owner: root

 # group: root

 user::rwx

 group::r-x

 other::r-x


# setfacl -m u:user_name:rw- /usr/bin/w


$ w

 bash: /usr/bin/w: 拒絕不符權限的操作


# getfacl /usr/bin/w  // 查詢指令 w 的權限

 getfacl: Removing leading '/' from absolute path names

 # file: usr/bin/w

 # owner: root

 # group: root

 user::rwx

 user:user_name:rw-

 group::r-x

 other::r-x
Semanage和Chcon的差異
Semanage 和 Chcon 的差異,在於 resotrecon 後的結果。
Semanage是改變該資料夾或檔案的SELinux type預設值,而Chcon是直接改變資料夾或檔案的SELinux type,在resotrecon時會套用該資料夾或檔案的SELinux type預設值。
建立 2 個資料夾:
使用 semanage(若 semanage 無法執行,請先安裝套件 policycoreutils-python)
使用 chcon
Semanage是改變該資料夾或檔案的SELinux type預設值,而Chcon是直接改變資料夾或檔案的SELinux type,在resotrecon時會套用該資料夾或檔案的SELinux type預設值。
建立 2 個資料夾:
- 示範 semanage 用的資料夾
- 示範 chcon 用的資料夾
- selinux context 設為 httpd_sys_content_t
# mkdir -p /secon/semanagerdir

# mkdir /secon/chcondir

# ll -dZ /secon/semanagerdir

 drwxr-xr-x. root root unconfined_u:object_r:default_t:s0 /secon/semanagedir/

# ll -dZ /secon/chcondir

 drwxr-xr-x. root root unconfined_u:object_r:default_t:s0 /secon/chcondir/
使用 semanage(若 semanage 無法執行,請先安裝套件 policycoreutils-python)
# ll -Zd /secon/semanagedir/

 drwxr-xr-x. root root system_u:object_r:default_t:s0   /secon/semanagedir/

# semanage fcontext -a -t httpd_sys_content_t '/secon/semanagedir(/.*)?'

# restorecon -FRvv /secon/semanagedir/

 restorecon reset /secon/semanagedir context system_u:object_r:default_t:s0->system_u:object_r:httpd_sys_content_t:s0

# ll -Zd /secon/semanagedir/

 drwxr-xr-x. root root system_u:object_r:httpd_sys_content_t:s0 /secon/semanagedir/
使用 chcon
# ll -Zd /secon/chcondir/

 drwxr-xr-x. root root system_u:object_r:default_t:s0   /secon/chcondir/

# chcon -t httpd_sys_content_t -R /secon/chcondir/

# ll -Zd /secon/chcondir/

 drwxr-xr-x. root root unconfined_u:object_r:httpd_sys_content_t:s0 /secon/chcondir/

# restorecon -FRvv /secon/chcon/

 restorecon reset /secon/chcondir context unconfined_u:object_r:httpd_sys_content_t:s0->system_u:object_r:default_t:s0

# ll -Zd /secon/chcondir/

 drwxr-xr-x. root root system_u:object_r:default_t:s0   /secon/chcondir/
安裝及移除套件-X Window System
若 Linux 系統是最小安裝(是 mini 而不是 mini desktop)後想要安裝 X-Windows,在 yum 套件群姐安裝的協助下變的超級簡單。
當然!你要先把 yum 和網路組態搞定。
網路設定:因為最小安裝沒有 setup 可用,因此要直接編輯 ifcfg-ethX,完成後重啟網路。
YUM 設定請參考此篇
查詢 X-Windows 套件
安裝 X-Windows 及 GNOME Desktop
下次啟動使用 X-Window 介面
重開機
當然!你要先把 yum 和網路組態搞定。
網路設定:因為最小安裝沒有 setup 可用,因此要直接編輯 ifcfg-ethX,完成後重啟網路。
# vi /etc/sysconfig/network-script/ifcfg-eth0  // 最小安裝沒有 vim 可以用,但操作差不多

 DEVICE="eth0"

 BOOTPROTO="dhcp"

 HWADDR="00:0C:29:16:03:D1"

 IPV6INIT="yes"

 NM_CONTROLLED="no"   // 預設為 yes

 ONBOOT="yes"  // 預設為 no

 TYPE="Ethernet"

 UUID="ad0722c8-66bb-4d03-8dd0-8be3c6cd0d8b"


# service network restart

# ip a
YUM 設定請參考此篇
查詢 X-Windows 套件
# yum grouplist | grep --color X

 Legacy UNIX compatibility

 Legacy X Window System compatibility

 X Window System

 TeX support

 Xfce

 Xhosa Support [xh]
安裝 X-Windows 及 GNOME Desktop
# yum groupinstall [-y] "X Window System" [&> /dev/null]  // 中括號 [] 內容加上後(不含 [])會自動安裝並隱藏安裝訊息

# yum groupinstall [-y] "Desktop" [&> /dev/null]

# yum groupinstall [-y] "Chinese Support [zh]" [&> /dev/null]  // 若想要支援中文環境再安裝就好
下次啟動使用 X-Window 介面
# vim /etc/inittab
 id:5:initdefault:
重開機
# reboot
Troubleshooting-FTP傳輸型態問題
FTP 傳輸型態有 ASCII 及 Binary 等 2 種:

範例:在 Linux 系統產生一文字檔,並在 Windows 的筆記本中開啟(請勿使用 Notepad++ 等文字編輯軟體,因為軟體會自動完成跳行動作,若使用FTP軟體請先設定為Binary型態下載,因為軟體會自動辨視資料型態並予以轉換,像FileZilla)
關閉 vsftpd 的 ascii 下載功能,這樣 windows 客戶端下載時就不會自動轉換。
在 Windows 的記事本中開啟 linuxtext.txt,發現內容沒有跳行。

可使用unix2dos.x86_64及dos2unix.x86_64來轉換格式。

- Binary :不做任何格式轉換的傳輸方式。
- ASCII :傳輸文字檔時會做格式轉換。ASCII 傳輸型態是為了符合 Window 文字檔編碼方式,例如跳行在 linux 是『\n』,但 windows 是『\r \n』,若在 Linux 編輯好文字檔,下載到 Windows 系統並開啟,所有文字會在同一行。
Binary 型態傳輸文字檔所產生的問題
# vim linuxtext.txt

 linux

 哈

 哈


# od -c linuxtext.txt

 0000000   l   i   n   u   x  \n 345 223 210  \n 345 223 210  \n

 0000016
關閉 vsftpd 的 ascii 下載功能,這樣 windows 客戶端下載時就不會自動轉換。
# vim /etc/vsftpd/vsftpd.conf

 ascii_download_enable=NO  // 表示 FTP 伺服器只支援 Binary 型態下載
在 Windows 的記事本中開啟 linuxtext.txt,發現內容沒有跳行。
可使用unix2dos.x86_64及dos2unix.x86_64來轉換格式。
# yum install -y unix2dos &> /dev/null  // 安裝時不顯示安裝流程


# od -c linuxtext.txt

 0000000   l   i   n   u   x  \n 345 223 210  \n 345 223 210  \n

 0000016


# unix2dos linuxtext.txt

 unix2dos: converting file linuxtext.txt to DOS format ...


# od -c linuxtext.txt

 0000000   l   i   n   u   x  \r  \n 345 223 210  \r  \n 345 223 210  \r

 0000020  \n

 0000021
ASCII 型態傳輸壓縮檔所產生的問題
範例:在 Windows 系統產生副檔名為 gz 的壓縮檔(軟體 7-zip),上載時使用 FileZilla 並指定 ASCII 型態,再下載至 Windows 系統解壓縮時會發現壓縮檔毀損,因此上傳檔案時最好使用 Binary 型態。