顯示具有 LINUX-網路儲存裝置 標籤的文章。 顯示所有文章

Samba 伺服器(第三版)

Samba 伺服器(第三版)修正了一些步驟並增加了觀念,但也簡化了內容,建議從舊版看起,可以了解作者遇到的問題和觀念的修正。

原始文章:Samba 伺服器(第二版)

微軟的網路芳鄰檔案系統為 CIFS(Common Internet File System),若想讓 Unix-Like 主機加入微軟的網路芳鄰並共享資源時,就必須架設 Samba Server,目的就是要讓微軟的使用者在網路芳鄰中看到這台主機的 NetBIOS name,進而存取共享的資源。


以下的示範,將分為二部份:
  1. 建立一個共享資料夾為 share(/srv/share),不必驗證即可登入與上傳
  2. 建立一個共享資料夾為 mygroup(/srv/mygroup),必須使用者驗證成功後,才可登入與上傳
安裝 Samba 伺服器(10.10.10.137) # yum install -y samba samba-client samba-common cifs-utils
開機時啟動 # chkconfig nmb on ; chkconfig smb on
開啟防火牆
# iptables -A INPUT -i eth0 -p tcp -m tcp --dport 21 -m state --state NEW -j ACCEPT
# iptables -A INPUT -i eth0 -p tcp -m state --state RELATED,ESTABLISHED -j ACCEPT
# iptables -I INPUT -i eth0 -p udp --dport 137:138 -m state --state NEW -j ACCEPT
# iptables -I INPUT -i eth0 -p tcp -m multiport --dport 139,445 -m state --state NEW -j ACCEPT
# service iptables save
# iptables -L -n | grep --color -Ew '13[789]|445'


Part1:建立一個共享資料夾為 share(/srv/share),不必驗證即可登入與上傳,編輯設定檔 /etc/samba/smb.conf

# mkdir /srv/share   // 建立共享資料夾
# chmod 2777 /srv/share  // 變更共享資料夾權限
# ll -dZ /srv/share  // SELinux 設定
 drwxrwsr-x. root root unconfined_u:object_r:var_t:s0 /srv/share
# chcon -t samba_share_t /srv/share
# ll -dZ /srv/share
 drwxrwsr-x. root root unconfined_u:object_r:samba_share_t:s0 /srv/share

# vim /etc/samba/smb.conf
 [global]
 workgroup = career
 security = usr
 passdb backend = tdbsam  // 檔案是 passdb.tdb

 [share]  // 共享目錄名稱,使用 smbclient 查詢時所顯示的共享資料夾名稱
 path = /srv/share
 guest ok = yes
 guest only = yes
 read only = no  // 同等於 writeable = yes

使用 testparm 測試 /etc/samba/smb.conf 語法是否正確。 # testparm  // 自動載入 /etc/samba/smb.conf;參數 -v 詳細列出
啟動服務 # service nmb start; service smb start
Samba 客戶端(10.10.10.129)測試
  1. 找出目前網域上的 Workgroup
  2. # nmblookup -A 10.10.10.160  // 亦可用主機名稱

  3. 查詢分享資源
  4. # smbclient -L 10.10.10.160  // 亦可用主機名稱

  5. 登入 samba 伺服器,並上傳資料到 /srv/share
  6. # smbclient //10.10.10.160/share
     Enter root's password: 直接按 Enter 進入
     Anonymous login successful
     Domain=[CAREER] OS=[Unix] Server=[Samba 3.5.10-125.el6]
    smb: \> put install.log
     putting file install.log as \install.log (9833.5 kb/s) (average 9833.7 kb/s)

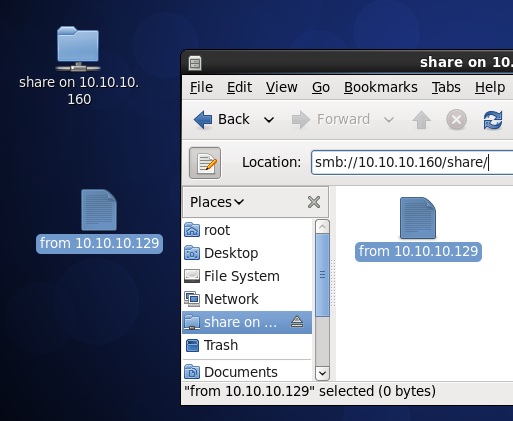
  7. 使用檔案總管 nautilus 登入並上傳
  8. # nautilus &

Part2:建立一個共享資料夾為 mygroup(/srv/mygroup),必須使用者驗證成功後,才可登入與上傳,編輯設定檔 /etc/samba/smb.conf

# useradd guest2  // 新增使用者guest2,當他登入/srv/mygroup時,是被目錄的安全性拒絕,而不是samba伺服器。
# passwd guest2
# groupadd -g 8000 sambauser
# mkdir /srv/mygroup       // 建立共享資料夾
# chgrp sambauser /srv/mygroup   // 變更共享資料夾群組
# chmod 2777 /srv/mygroup    // 變更共享資料夾權限
# chcon -t samba_share_t /srv/mygroup  // SELinux 設定

# vim /etc/samba/smb.conf
 [global]
 workgroup = career
 security = usr
 passdb backend = tdbsam  // 檔案是 passdb.tdb

 [share]  // 共享目錄名稱,使用 smbclient 查詢時所顯示的共享資料夾名稱
 path = /srv/share
 guest ok = yes
 guest only = yes
 read only = no  // 同等於 writeable = yes

 [members]  // 共享目錄名稱,使用 smbclient 查詢時所顯示的共享資料夾名稱
 path = /srv/mygroup
 guest ok = no
 guest only = no
 read only = no  // 同等於 writeable = yes
 vaild users = @sambauser  // 允許群組成員存取
 invaild users = guest  // 拒絕使用者guest存取

samba使用者條件:
  1. 必須為Linux用戶
  2. 使用smbpasswd建立登入密碼,注意!使用者的samba密碼與系統登入密碼是不相同的。
新增 Samba 使用者
  • 『user』,群組為『sabmauser』,密碼為『1』
  • 『guest』,群組為『sabmauser』,密碼為『1』
  • 『guest2』,不屬於群組『sabmauser』,密碼為『1』
  • # useradd -G 8000 -s /sbin/nologin user
    # smbpasswd -a sambauser1
     New SMB password: 『1』
     Retype new SMB password: 『1』
     Added user sambauser.

    # useradd -G 8000 -s /sbin/nologin guest # smbpasswd -a guest
     New SMB password: 『1』
     Retype new SMB password: 『1』
     Added user sambauser2.

    # useradd -s /sbin/nologin guest2 # smbpasswd -a guest2
     New SMB password: 『1』
     Retype new SMB password: 『1』
     Added user sambauser2.

    查詢 samba 使用者資料庫 # pdbedit -L  // 查看 samba 使用者是否已建立;-v詳細模式
     user:505:
     guest:500:guest
     guest2:504:

    啟動服務
    # service smb start
    Samba 客戶端(10.10.10.129)測試 登入 samba 伺服器 # smbclient //10.10.10.160/members -U user
     Enter user's password:
     Domain=[CAREER] OS=[Unix] Server=[Samba 3.5.10-125.el6]
     smb: \> exit

    # smbclient //10.10.10.160/members -U guest
     Enter guest's password:
     Domain=[CAREER] OS=[Unix] Server=[Samba 3.5.10-125.el6]
     tree connect failed: NT_STATUS_ACCESS_DENIED  // 此連線是被samba伺服器拒絕

    # smbclient //10.10.10.160/members -U guest2
     Enter guest2's password:
     Domain=[CAREER] OS=[Unix] Server=[Samba 3.5.10-125.el6]
     tree connect failed: NT_STATUS_ACCESS_DENIED  // 此連線是被目錄拒絕

    FTP伺服器

    建立一個可以讓使用者登入家目錄及匿名者上傳的 FTP 伺服器。


    FTP 伺服器(10.10.10.160)


    安裝 # yum install vsftpd
    開機時啟動 # chkconfig vsftpd on
    啟動服務 # service vsftpd start

    Part1:讓匿名者上傳檔案


    編輯組態檔 /etc/vsftpd/vsftpd.conf # vim /etc/vsftpd/vsftpd.conf
     anon_root=/var/ftp/pub
     anonymous_enable=YES
     write_enable=YES
     anon_upload_enable=YES

    # setsebool -P allow_ftpd_anon_write on

    # service vsftpd restart

    產生上傳目錄 # mkdir /var/ftp/pub/upload
    # chmod 1777 /var/ftp/pub/upload
    # ll -d /var/ftp/pub/upload
     drwxrwxrwt. 2 root root 4096 Dec 13 13:50 /var/ftp/pub/upload

    防火牆設定 # iptables -A INPUT -i eth0 -p tcp -m state --state ESTABLISHED,RELATED -j ACCEPT
    # iptables -A INPUT -i eth0 -p tcp -m state --state NEW,INVALID -j DROP
    # iptables -I INPUT -i eth0 -p tcp --dport 21 -m state --state NEW -j ACCEPT

    FTP 客戶端測試(10.10.10.129) # ftp 10.10.10.160
      Connected to 10.10.10.160 (10.10.10.160).
      220 (vsFTPd 2.2.2)
      Name (10.10.10.160:root): anonymous
      331 Please specify the password.
      Password: 直接按 Enter 進入
      230 Login successful.
      Remote system type is UNIX.
      Using binary mode to transfer files.
    ftp> dir
      227 Entering Passive Mode (10,10,10,160,86,44).
      150 Here comes the directory listing.
      drwxrwxrwt 2 0 0 4096 Dec 13 05:50 upload
      226 Directory send OK.
    ftp> cd upload
      250 Directory successfully changed.
    ftp> put install.log
      local: install.log remote: install.log
      227 Entering Passive Mode (10,10,10,160,158,187).
      553 Could not create file.  上傳檔案被拒絕!?

    註:成功連線後,使用指令 dir 或 ls 查看內容(包含其他指令,例如 put..),但畫面卻卡住,大部份是 FTP 伺服器沒有載入 nf_conntrack_ftp 模組,因為伺服器回應時不是透過 21port,而是以一個亂數產生的 port number 回應,而這個 port number 會被防火牆阻擋。 10.10.10.160# modprobe nf_conntrack_ftp
    解決匿名上傳檔案被拒絕的問題(SELinux) # tail -f /var/log/messages
     Dec 13 15:12:41 localhost setroubleshoot: [avc.ERROR] Plugin Exception catchall_boolean #012Traceback
     (most recent call last):#012 File "/usr/lib64/python2.6/site-packages/setroubleshoot/analyze.py", line 191, in
     analyze_avc#012 report = plugin.analyze(avc)#012 File "/usr/share/setroubleshoot/plugins/catchall_boolean.py",
     line 90, in analyze#012 man_page = self.check_for_man(b)#012 File
     "/usr/share/setroubleshoot/plugins/catchall_boolean.py", line 76, in check_for_man#012 man_page =
     name.split("_")[0] + "_selinux"#012AttributeError: 'tuple' object has no attribute 'split' Dec 13 15:12:41
     localhost setroubleshoot: SELinux is preventing /usr/sbin/vsftpd from write access on the directory upload.
     For complete SELinux messages. run sealert -l c5f97a15-0622-4443-bdb3-a9ae3ac693c9  // 這個錯誤訊息
     要裝 setroubleshoot 才會顯示


    # sealert -l c5f97a15-0622-4443-bdb3-a9ae3ac693c9
     If you want to allow /usr/sbin/vsftpd to be able to write to shared public content Then you need to
     change the label on upload to public_content_rw_t
    , and potentially turn on the
     allow_httpd_sys_script_anon_write boolean.

    # ll -dZ /var/ftp/pub/upload/
     drwxrwsrwt. root root unconfined_u:object_r:public_content_t:s0 /var/ftp/pub/upload/
    # chcon -t public_content_rw_t /var/ftp/pub/upload/
    # ll -dZ /var/ftp/pub/upload/
     drwxrwsrwt. root root unconfined_u:object_r:public_content_rw_t:s0 /var/ftp/pub/upload/

    Part2:讓系一般使用者帳密登入自己家目錄,並讓家目錄成為使用者的根目錄


    使用一般使用者帳密登入 # ftp 10.10.10.160
     Connected to 10.10.10.160 (10.10.10.160).
     220 (vsFTPd 2.2.2)
     Name (10.10.10.160:root): guest
     331 Please specify the password.
     Password:
     500 OOPS: cannot change directory:/home/guest
     Login failed.

    編輯組態檔 /etc/vsftpd/vsftpd.conf # vim /etc/vsftpd/vsftpd.conf
     anon_root=/var/ftp/pub
     anonymous_enable=YES
     write_enable=YES
     anon_upload_enable=YES

     local_enable=YES
     chroot_local_user=YES
     passwd_chroot_enable=YES  // 此設定是參考/etc/passwd內容

    # setsebool -P ftp_home_dir on

    # service vsftpd restart

    chroot限制使用者到其他目錄,只能存取自己家目錄底下的子目錄。 # ftp 10.10.10.160
     Connected to 10.10.10.160 (10.10.10.160).
     220 (vsFTPd 2.2.2)
     Name (10.10.10.160:root): guest
     331 Please specify the password.
     Password:
     230 Login successful.
     Remote system type is UNIX.
     Using binary mode to transfer files.

    ftp> pwd
     257 "/"

    NFS伺服器(第二版)

    NFS(Network FileSystem)的功能就是可以透過網路,讓不同的機器、不同的作業系統、可以彼此分享個別的檔案 (share files) 並進行操作。


    NFS Server(10.10.10.160)
    NFS 需要遠端程序呼叫 (RPC) 的服務,因此安裝 rpcbind 套件。
    RPC服務啟動後,會開啟應用程式portmapper(111 port),這支應用程式的功能有2個:
    1. NFS或NIS服務啟動時,會先portmapper註冊,由portmapper動態分配port number。
    2. 讓客戶端提出NFS服務要求時,必須透過portmapper得到正確的NFS資訊。
    # yum install -y nfs-utils rpcbind
    開機時啟動
    # chkconfig nfs on
    # chkconfig rpcbind on

    啟動服務
    # service rpcbind start  // 先啟動
    # service nfs start  // NFS服務向portmapper註冊,要求mountd的port number。

    註:NFS啟動後會提供2個服務程式rpc.mountd(/etc/exports)及rpc.nfsd。

    新增1GB容量的分割區供客戶端掛載 # palimpsest &  // 新分割代號/dev/sda4,使用palimpsest的好處是不用重開機。
    # mkfs.ext4 /dev/sda4
    # mkdir /mnt/nfs  // 建立掛載點
    # chmod 1775 /mnt/nfs
    # mount /dev/sda4 /mnt/nfs

    固定mountd的port number,因為開機或重啟服務時port number是隨機產生的,如果沒有固定,無法進行防火牆的設定。 # cp /etc/sysconfig/nfs /etc/sysconfig/nfs.bak
    # sed 's/#MOUNTD_PORT=892/MOUNTD_PORT=12345/g' /etc/sysconfig/nfs
    # sed -i 's/#MOUNTD_PORT=892/MOUNTD_PORT=12345/g' /etc/sysconfig/nfs  // 參數-i:直接修改讀取的檔案內容,而不是由螢幕輸出。
    # service nfs restart  // 固定port number之後必須重啟服務才會生效

    防火牆設定:請注意先後順序
    # iptables -F
    # service iptables save
    # iptables -I INPUT -i eth0 -m state --state ESTABLISHED,RELATED -j ACCEPT
    # iptables -I INPUT -i eth0 -m state --state NEW,INVALID -j DROP
    # iptables -I INPUT -i eth0 -p tcp --dport 111 -m state --state NEW -j ACCEPT  // 沒開111port,客戶端rpcinfo和showmount會卡住
    # iptables -I INPUT -i eth0 -p tcp --dport 111 -m state --state NEW -j ACCEPT
    # iptables -I INPUT -i eth0 -p tcp --dport 12345 -m state --state NEW -j ACCEPT
    # iptables -I INPUT -i eth0 -p tcp --dport 12345 -m state --state NEW -j ACCEPT
    # iptables -I INPUT -i eth0 -p tcp --dport 2049 -m state --state NEW -j ACCEPT

    NFS 伺服器端分享資料夾設定
    # vim /etc/exports
     /mnt/nfs *(rw,sync)
    # exportfs -r

    補充:
  • NFS真正的設定檔在/var/lib/nfs/etab
  • # cat /var/lib/nfs/etab
     /mnt/nfs *(ro,sync,wdelay,hide,nocrossmnt,secure,root_squash,no_all_squash,no_subtree_check,secure_locks,acl,anonuid=65534,anongid=65534)

  • 修改 /etc/exports 內容後,重啟 NFS 服務套用更新,但會使得在線上的使用者斷線,使用以下指令可避免此情況發生。
  • # exportfs -rv  // 參數『v』代表詳細模式,可以不用加
  • 以下四個參數,讓 NFS 客戶端使用者登入 NFS 伺服端時,轉換身份(以 UID 為主)並取得相對應的權限操作。


  • NFS Client(10.10.10.129) # rpcinfo -p 10.10.10.160  // 查看NFS伺服器是否有提供NFS服務
    # showmount -e 10.10.10.160
     Export list for 10.10.10.160:
     /mnt/nfs *
    # mkdir /mnt/nfsclient
    # mount 10.10.10.160:/mnt/nfs /mnt/nfsclient
    # df -h
     檔案系統 1K- 區段 已用 可用 已用 % 掛載點
     10.10.10.160:/mnt/nfs 996M 18M 929M 2% /mnt/nfsclient

    注意:無法對資料夾/mnt/nfsclient進行新增刪除的操作。
    NFS客戶端的身份為管理者root,但登入NFS伺服端後,系統會變更成使用者nfsnobody,而nfsnobody的權限對資料夾只有讀的權限。
    有2種方法可以解決這個問題,都是在NFS伺服器端上設定
    1. 將共享資料夾的使用者權限變更成xx7
    2. 在/etc/exports組態檔中加入no_root_squash參數,讓客戶端的管理者登入後亦維持管理者身份但此舉會降低系統安全性的風險
    開機時掛載
    # vim /etc/fstab
     10.10.10.160:/mnt/nfs /mnt/nfsclient/ nfs ro 0 0

    Troubleshooting


  • 無法掛載:若出現被 NFS Server 拒絶的訊息,請先檢查是否有權限存取。假設 NFS Server 設定只有 10.10.10.128 可以存取,但目前的 NFS Client 的 IP 是 10.10.10.129,因此會被拒絕。
  • client # mount nfs_server_ip:/var/ftp /mnt/nfsclient
       mount.nfs: access denied by server while mounting nfs_server_ip:/var/ftp
    client # showmount -e nfs_server_ip
       Export list for nfs_server_ip:
       /var/ftp 10.10.10.128

    Samba 伺服器-網頁式管理畫面

    套件名稱 samba-swat,通訊埠為 901
    登入網址:
    http://127.0.0.1:901/
    http://localhost:901/
    http://[::1]:901/  // IPv6

    安裝 SWAT
    # yum install -y samba-swat
    開機時啟動
    # chkconfig swat on
    登入管理畫面 http://127.0.0.1:901,帳號為 root


    從其他 IP 位址無法登入,因為 SWAT 的組態檔設定只允許 127.0.0.1 登入,註解後即可從其他 IP 位址登入
    # vim /etc/xinetd.d/swat
     service swat
     {
      disable = no
      port = 901
      socket_type = stream
      wait = no
      # only_from = 127.0.0.1
      user = root
      server = /usr/sbin/swat
      log_on_failure += USERID
     }

    # srvice xinetd restart

    Samba 伺服器(第二版)

    原始文章:Samba 伺服器

    微軟的網路芳鄰檔案系統為 CIFS(Common Internet File System),若想讓 Unix-Like 主機加入微軟的網路芳鄰並共享資源時,就必須架設 Samba Server,目的就是要讓微軟的使用者在網路芳鄰中看到這台主機的 NetBIOS name,進而存取共享的資源。

    以下範例需要認證才能登入共享資料夾
    安裝 Samba Server(10.10.10.137)
    # yum install -y samba(samba-client cifs-utils) 註:
  • samba-client 套件:smbclient 指令查詢伺服器所分享的資訊,可選擇性安裝,若對自己的伺服器設定有把握的話
  • cifs-utils 套件:網路芳鄰檔案系統格式,沒有安裝就無法掛載,錯誤訊息請看 Troubleshooting
  • 以上兩個套件在客戶端都必須安裝

    開機時啟動
    # chkconfig nmb on ; chkconfig smb on
    開啟防火牆
    # iptables -I INPUT -p udp --dport 137:138 -j ACCEPT
    # iptables -I INPUT -p tcp --dport 139 -j ACCEPT
    # iptables -I INPUT -p tcp --dport 445 -j ACCEPT
    # service iptables save
    # iptables -L -n | grep --color -Ew '13[789]|445'


    設定共享資料及存取權限,組態檔 /etc/samba/smb.conf
    # groupadd -r sambauser
    # mkdir -p /sharedir/santana      // 建立共享資料夾
    # chgrp sambauser /sharedir/santana  // 變更共享資料夾群組
    # chmod 2775 /sharedir/santana    // 變更共享資料夾權限
    # chcon -t samba_share_t /sharedir/santana  // SELinux 設定
    # vim /etc/samba/smb.confg
     [global]
     workgroup = career
     security = usr        // share 不需要認證,user 需要認證
     passdb backend = tdbsam  // 檔案是 passdb.tdb
     ; hosts allow = 127. 192.168.0  // 先用分號註解。

     [santana]  // 共享目錄名稱,使用 smbclient 查詢時所顯示的共享資料夾名稱
     path = /sharedir/santana
     write list = @sambauser
     writeable = yes
     public = no
     browseable = yes
     ; hosts allow = 127. 192.168.0  // 先用分號註解。
    注意:
    hosts allow 放在 global 區段和一般共享資料夾設定區段內,會有不同的訊息
    但相同的是都無法存取
  • global 區段:除了允許的網段外,其餘的主機用 smbclient 也看不到分享資 訊,錯誤訊息請看 Troubleshooting 2
  • 一般共享資料夾設定區段:除了允許的網段外,其餘主機用 smbclient 看得到分享資訊,但不能存取或掛載,錯誤訊息請看 Troubleshooting 3

  • 使用 testparm 測試 /etc/samba/smb.conf 語法是否正確。
    # testparm  // 自動載入 /etc/samba/smb.conf

    新增 3 個 Samba 使用者,待會做測試用。
  • 『sabmauser』,群組為『sabmauser』,密碼為『1』
  • 『sabmauser2』,群組不是『sabmauser』,密碼為『1』
  • 『sabmauser3』,群組為『sabmauser』,密碼為『1』
  • # useradd -s /sbin/nologin sambauser
    # smbpasswd -a sambauser
     New SMB password: 『1』
     Retype new SMB password: 『1』
     Added user sambauser.
    # useradd -s /sbin/nologin sambauser2
    # smbpasswd -a sambauser2
     New SMB password: 『1』
     Retype new SMB password: 『1』
     Added user sambauser2.
    # useradd -s /sbin/nologin -G sambauser sambauser3
    # smbpasswd -a sambauser3
     New SMB password: 『1』
     Retype new SMB password: 『1』
     Added user sambauser3.

    查詢 samba 使用者資料庫
    # pdbedit -L
     sambauser:502:  // 查看 samba 使用者是否已建立
     sambauser2:503:
     sambauser3:504:

    啟動服務
    # service nmb start ; service smb start

    Linux 平台測試(10.10.10.138)

    安裝 Samba Client 套件
    # yum install -y samba-client cifs-utils
    查看 Samba Server 共享資源訊息
    # smbclient -L 10.10.10.137

    存取共享目錄,但無法支援許多常用的指令,故建議掛載以方便進行操作。
    # smbclient //10.10.10.137/santana -U sambauser%1  // santana 是共享資料夾的設定名稱 [santana]

    手動掛載,順便測試 sambauser、sambauser2 及 sambauser3 存取狀態。
    # mkdir /mnt/smb
    # mount //10.10.10.137/santana /mnt/smb -o username=sambauser%1
    # df
    # touch i.am.sambauser.txt
    # mount //10.10.10.137/santana /mnt/smb -o username=sambauser2%1
    # mount //10.10.10.137/santana /mnt/smb -o username=sambauser3%1
    # df
    # touch i.am.sambauser3.txt
    # ll /mnt/smb


    注意!雖然可以用不同帳號同時掛載,但新增檔案所屬為最後掛載的使用者,而為何 sambauser2 會掛載失敗,因為在 smb.conf 的設定,是只有 sambauser 群組,才能存取。

    開機時掛載
    # chkconfig netfs on
    # service netfs start
    # echo '//10.10.10.137/santana /mnt/smb cifs username=sambauser%1 0 0' >> /etc/fstab
    # mount -a

    Troubleshooting

    無法掛載訊息
    # mount //10.10.10.137/share_samba /mnt/samba/ -o username=sambauser%1
     mount: block device //10.10.10.137/share_samba is write-protected, mounting read-only
     mount: cannot mount block device //10.10.10.137/share_samba read-only

    查詢系統記錄
    # tail messages
     Oct 17 22:24:08 sambaserver137 kernel: CIFS VFS: cifs_mount failed w/return code = -13
     Oct 17 22:24:16 sambaserver137 tpvmlpd2[2886]: device type not supported
     Oct 17 22:24:16 sambaserver137 tpvmlpd2[1895]: aborting
     Oct 17 22:24:24 sambaserver137 kernel: CIFS VFS: cifs_mount failed w/return code = -22
     Oct 17 22:24:28 sambaserver137 kernel: Status code returned 0xc000006d NT_STATUS_LOGON_FAILURE
     Oct 17 22:24:28 sambaserver137 kernel: CIFS VFS: Send error in SessSetup = -13
     Oct 17 22:24:28 sambaserver137 kernel: CIFS VFS: cifs_mount failed w/return code = -13
     Oct 17 22:24:28 sambaserver137 kernel: Status code returned 0xc000006d NT_STATUS_LOGON_FAILURE
     Oct 17 22:24:28 sambaserver137 kernel: CIFS VFS: Send error in SessSetup = -13
     Oct 17 22:24:28 sambaserver137 kernel: CIFS VFS: cifs_mount failed w/return code = -13

    安裝 cifs-utils 套件,讓系統能辨視裝置格式
    # yum install -y cifs-utils.x86_64

    Troubleshooting 2

    hosts allow 設定在 global 區段
    # smbclient -L 10.10.10.137
     Enter root's password:
     protocol negotiation failed: NT_STATUS_INVALID_NETWORK_RESPONSE

    Troubleshooting 3

    hosts allow 設定在一般共享資料夾區段

    Samba 伺服器

    微軟的網路芳鄰檔案系統為 CIFS(Common Internet File System),若想讓 Unix-Like 主機加入微軟的網路芳鄰並並享資源時,就必須架設 Samba Server,目的就是要讓微軟的使用者在網路芳鄰中看到這台主機的 NetBIOS name,進而存取享的資源。

    以下範例需要認證才能登入共享資料夾
    安裝 Samba Server
    # yum install -y samba
    開機時啟動
    # chkconfig nmb on  // 提供 NetBIOS 名稱解析
    # chkconfig smb on  // 提供檔案共享及列印服務

    開啟防火牆,nmbd 通訊埠為 137(udp)、138(udp),smbd 通訊埠為 139(tcp)、445(tcp)
    # iptables -I INPUT -p udp --dport 137:138 -j ACCEPT
    # iptables -I INPUT -p tcp --dport 139 -j ACCEPT
    # iptables -I INPUT -p tcp --dport 445 -j ACCEPT
    # service iptables save

    設定共享資料及存取權限,組態檔 /etc/samba/smb.conf
    # mkdir /sharedir  // 建立共享資料夾
    # chcon -t samba_share_t /sharedir  // SELinux設定
    # vim /etc/samba/smb.confg
     [global]
     workgroup = career
     netbios name = santanalee
     security = usr  //share 不需要認證,user 需要認證
     passdb backend = tdbsam  // 檔案是 passdb.tdb

     [share_samba]  // 共享目錄名稱
     path = /sharedir
     valid users = sambauser
     writeable = yes
     public = no
     browseable = yes  // 若設定為no,但如果登入者知道完整路徑仍可存取。
     available = yes  // 此區段設定是否動作,預設是yes,可以不用輸入

    使用 testparm 測試 /etc/samba/smb.conf 語法是否正確。
    故意在組態檔內寫入一個錯誤參數名稱 printers。
    # testparm  // 自動載入 /etc/samba/smb.conf
     Load smb config files from /etc/samba/smb.conf
     rlimit_max: increasing rlimit_max (1024) to minimum Windows limit (16384)
     Processing section "[homes]"
     Processing section "[printers]"
     Unknown parameter encountered: "aprintable"
     Ignoring unknown parameter "aprintable"
     WARNING: [printers] service MUST be printable!
     Loaded services file OK.
     Server role: ROLE_STANDALONE
     Press enter to see a dump of your service definitions

    新增 Samba 使用者『sabmauser』,密碼為『1』
    # useradd -s /sbin/nologin sambauser
    # smbpasswd -a sambauser
     New SMB password: 『1』
     Retype new SMB password: 『1』
     Added user sambauser.

    查詢 samba 使用者資料庫
    # pdbedit -L
     sambauser:502:

    啟動服務
    # service nmb start ; service smb start

    Windows 平台測試

    1. 打開網路芳鄰,可以看到 NetBIOS Name 為 SANTANALEE 的主機


    2. 進入主機要輸入帳/密 (sambauser/1)


    3. 登入後可看見共享目錄 share_samba 及使用者家目錄


    4. 登入使用者家目錄遭系統拒絕,是因為 SELinux 關係

    5. 設定 SELinux 布林值
      # setsebool -P samba_enable_home_dirs 1

    Linux 平台測試

    安裝 Samba Client 套件
    # yum install -y samba-client
    查看 Samba Server 共享資源訊息
    # smbclient -L 10.10.10.137

    存取共享目錄,但無法支援許多常用的指令,故建議掛載以方便進行操作。
    # smbclient //10.10.10.137/share_samba -U sambauser%1
     // 可使用 NetBIOS Name 或 IP 位址,另外 sambauser%1 的寫法,密碼會留在歷史資料內,不加 %1 系統會出現提示輸入訊息。


    手動掛載
    # mkdir /mnt/smb
    # mount(-t cifs)//10.10.10.137/share_samba /mnt/smb -o username=sambauser%1  // 檔案系統參數可以不用下
    # df


    開機時掛載
    # chkconfig netfs on
    # service netfs start
    # echo '//10.10.10.137/share_samba /mnt/smb cifs username=sambauser%1 0 0' >> /etc/fstab
    # mount -a

    iSCSI 伺服器(IP-SAN)

    iSCSI 範例:準備 2 台電腦
    Target(192.168.18.128):建置及規劃 iSCSI 儲存設備
    Initiator(192.168.18.131):主要功能是提供電腦主機連線到 Target 作磁碟存取

    (注意:使用 VMware Player,在安裝完 1 個虛機後,雖然可以複製更名成另一個新的虛機,但在 iSCSI 的練習中,iSCSI Initiator 會在開機時(/etc/fstab)掛載失敗(fsck fail),除非你有時間去打怪,不然請避免使用專案複製方式練習

    iSCSI Target(192.168.18.128)

    # yum search scsi | grep --color target
     scsi-target-utils.x86_64 : The SCSI target daemon and utility programs
    # yum install -y scsi-target-utils  // 安裝 iSCSI Target 套件
    # cp /etc/tgt/targets.conf /etc/tgt/targets.conf.backup  // 備份原始設定檔
    # fdisk -l
     Disk /dev/sdb: 1073 MB, 1073741824 bytes  // 使用 VMware Player 配置了一個 1GB
     255 heads, 63 sectors/track, 130 cylinders
     Units = cylinders of 16065 * 512 = 8225280 bytes
     Sector size (logical/physical): 512 bytes / 512 bytes
     I/O size (minimum/optimal): 512 bytes / 512 bytes
     Disk identifier: 0x00000000
    # fdisk /dev/sdb              // 配置分享磁區,不用格式化
    # fdisk -l


    # vim /etc/tgt/targets.conf  // 設定分享磁區
     <target iqn.2012-10.com.example:server.target1="iqn.2008-09.com.example:server.target1">
    backing-store /dev/sdb1
     </target>

    啟動 iSCSI  Target 服務:服務名稱為 tgtd
    # service tgtd start
     Starting SCSI target daemon: [ OK ]

    開啟防火牆:通訊埠為 3260
    # iptables -A INPUT -p tcp -m tcp --dport 3260 -j ACCEPT

    iSCSI Initiator(192.168.18.131)

    # yum search scsi | grep --color initiator
     iscsi-initiator-utils.i686 : iSCSI daemon and utility programs
    # yum install -y iscsi-initiator-utils.i686  // 安裝 iSCSI Initiator 套件
    # iscsiadm -m discovery -t st -p 192.168.18.128  // 搜尋定分享磁區
     Starting iscsid: [ OK ]             // 啟動 iSCSI Initiator 服務
     192.168.18.128:3260,1 iqn.2008-09.com.example:server.target1

    補充:若要再偷賴點,可在搜尋後就立即登入
    # iscsiadm -m discovery -t st -p 192.168.18.128 -l
    登入 iSCSI Target
    # iscsiadm -m node -l  // -l:login;-u:logout
     Logging in to [iface: default, target: iqn.2008-09.com.example:server.target1, portal: 192.168.18.128,3260] (multiple)
     Login to [iface: default, target: iqn.2008-09.com.example:server.target1, portal: 192.168.18.128,3260] successful.
    補充:以下 2 種方式皆可登入。
  • # iscsiadm -m node -l
  • # iscsiadm -m node -T iqn.2008-09.com.example:server.target1 -l

  • 查看 iSCSI 載入狀態 # dmesg | tail


    查看磁區狀態
    # fdisk -l

    硬碟配置、格式化及掛載
    # fdisk /dev/sdb
    # fdisk /dev/sdc
    # mkfs.ext4 /dev/sdb1 ; mkfs.ext4 /dev/sdc1
    # mkdir /mnt/iscsi1
    # mkdir /mnt/iscsi2
    # mount /dev/sdb1 /mnt/iscsi1
    # mount /dev/sdc1 /mnt/iscsi2

    開機時掛載
    # vim /etc/fstab
     /dev/sdb1 /mnt/iscsi1 ext4 _netdev 1 2  // 裝置名稱亦可使用 UUID,使用指令# blkid /dev/sdb1 查看
     /dev/sdc1 /mnt/iscsi2 ext4 _netdev 1 2
    # mount -a
    # df
     /dev/sdb1 2060144 35840 1919656 2% /mnt/iscsi1
     /dev/sdc1 1027004 17668 957168 2% /mnt/iscsi2

    若下次開機時不再掛載使用,除了移除/etc/fstab的設定外,也要登出並停止相關服務,否則下次開機會停頓很久,因為服務程式在搜尋網域可用的target,但仍然可以開機。 # iscsiadm -m node -u
    # chkconfig iscsi off
    # chkconfig iscsid off

    問題探討


    當有二個 initiator 同時存取同一個 iSCSI 裝置時,資料會毀損。
    因為這二個 initiator 並不會互相通知更新資料,故除了資料毀損外,各自上傳的檔案,對方也看不到。
    叢集檔案系統(Cluster File System、CFS)應用,像是 RedHat GFS 或是 Oracle OCFS2 檔案系統,便是解決此問題的方法。

    NFS伺服器

    20121211 修訂 NFS 伺服器內容,請參考 NFS 伺服器(第二版)

    NFS(Network FileSystem)的功能就是可以透過網路,讓不同的機器、不同的作業系統、可以彼此分享個別的檔案 (share files) 並進行操作。

    NFS Server(10.10.10.128)
    NFS 需要遠端程序呼叫 (RPC) 的服務,因此安裝 rpcbind 套件。
    # yum install -y nfs-utils rpcbind
    開機時啟動
    # chkconfig nfs on
    # chkconfig rpcbind on

    啟動服務
    # service rpcbind start  // 先啟動
    # service nfs start

    關閉防火牆
    # iptables -F

    NFS 伺服器端分享資料夾設定
    # vim /etc/exports
     /var/ftp *(ro)
    # service nfs restart

    補充:


  • 修改 /etc/exports 內容後,重啟 NFS 服務套用更新,但會使得在線上的使用者斷線,使用以下指令可避免此情況發生。
  • # exportfs -rv  // 參數『v』代表詳細模式,可以不用加
  • 以下四個參數,讓 NFS 客戶端使用者登入 NFS 伺服端時,轉換身份(以 UID 為主)並取得相對應的權限操作。


  • NFS Client(10.10.10.129) # rpcinfo -p 10.10.10.128  // 查看 NFS 伺服器是否有提供 NFS 服務
    # showmount -e 10.10.10.128
     Export list for 10.10.10.128:
     /var/ftp *
    # mkdir /mnt/nfsclient
    # mount 10.10.10.128:/var/ftp /mnt/nfsclient
    # df
     檔案系統                1K- 區段   已用     可用     已用 % 掛載點
     10.10.10.128:/var/ftp 15163392 2951168 11441664 21% /mnt/nfsclient
    注意:無法對資料夾 /mnt/nfsclient 進行新增刪除的操作。
    NFS 客戶端的身份為管理者 root,但登入 NFS 伺服端後,系統會變更成使用者 nfsnobody,而通常使用者的權限對資料夾只有讀的權限。
    有 2 種方法可以解決這個問題,都是在 NFS 伺服器端上設定
    1. 將共享資料夾的使用者權限變更成 xx7
    2. 在 /etc/exports 組態檔中加入 no_root_squash 參數,讓客戶端的管理者登入後亦維持管理者身份但此舉有降低系統安全性的風險
    開機時掛載
    # vim /etc/fstab
     nisserver128.example.com:/var/ftp /mnt/nfsclient nfs ro 0 0


    補充:NFS 伺服器端防火牆設定


    NFS 服務埠號為 2049,rpcbind 服務埠號為 111,除此之外 STATD_PORT、MOUNTD_PORT、LOCKD_UDPPORT、LOCKD_TCPPORT 埠號皆系統會隨機配置,造成 NFS 客戶端無法連線,因此若不固定埠號,就是要把整個防火牆關閉,但此舉非常危險。
    # vim /etc/sysconfig/nfs
     RQUOTAD_PORT=875
     LOCKD_TCPPORT=32769
     LOCKD_UDPPORT=32769
     MOUNTD_PORT=892
     STATD_PORT=662
    # iptables -A INPUT -p tcp -m state --state NEW -m tcp --dport 111 -j ACCEPT
    # iptables -A INPUT -p udp -m state --state NEW -m udp --dport 111 -j ACCEPT
    # iptables -A INPUT -p tcp -m state --state NEW -m tcp --dport 875 -j ACCEPT
    # iptables -A INPUT -p udp -m state --state NEW -m udp --dport 875 -j ACCEPT
    # iptables -A INPUT -p tcp -m state --state NEW -m tcp --dport 32769 -j ACCEPT
    # iptables -A INPUT -p udp -m state --state NEW -m udp --dport 32769 -j ACCEPT
    # iptables -A INPUT -p tcp -m state --state NEW -m tcp --dport 662 -j ACCEPT
    # iptables -A INPUT -p udp -m state --state NEW -m udp --dport 662 -j ACCEPT
    # iptables -A INPUT -p tcp -m state --state NEW -m tcp --dport 892 -j ACCEPT
    # iptables -A INPUT -p udp -m state --state NEW -m udp --dport 892 -j ACCEPT
    # iptables -A INPUT -p tcp -m state --state NEW -m tcp --dport 2049 -j ACCEPT
    # iptables -A INPUT -p udp -m state --state NEW -m udp --dport 2049 -j ACCEPT
    # service nfs restart


    Troubleshooting


  • 無法掛載:若出現被 NFS Server 拒? 的訊息,請先檢查是否有權限存取。假設 NFS Server 設定只有 10.10.10.128 可以存取,但目前的 NFS Client 的 IP 是 10.10.10.129,因此會被拒絕。
  • client # mount nfs_server_ip:/var/ftp /mnt/nfsclient
       mount.nfs: access denied by server while mounting nfs_server_ip:/var/ftp
    client # showmount -e nfs_server_ip
       Export list for nfs_server_ip:
       /var/ftp 10.10.10.128