製作 Legacy+UEFI 雙分區 Windows 安裝碟~~

****注意:開機系統碟必須是FAT32格式。
下載學校所提供的ISO,並使用微軟或rufus的工具,所製作的系統安裝隨身碟版本,無法通過學校的KMS授權認證,
WIN10_1803版本的安裝檔案,有單檔就超過4GB,無法複製到FAT32格式隨身碟
因此需要將FAT32及NTFS格式做在同一個隨身碟,FAT32為系統開機碟,NTFS放置安裝檔案。
以下有完整的教學影片,內容十分詳盡。
所需要的工具都是FREE的:1. DiskGenius;2. BOOTICE;3.QUEM我沒有下載,直接插電腦測試。
※※※最後確認BIOS開機模式設定Legacy或UEFI時,都可以進到WINDOWS的安裝畫面。

把OneDrive從 Windows 10的檔案總管介面中隱藏

1. 關閉檔案總管。 2. 按下「Windows」+「R」鍵叫出「執行」視窗,輸入「regedit」。
3. 瀏覽: HKEY_CLASSES_ROOT\CLSID\{018D5C66-4533-4307-9B53-224DE2ED1FE6}
4. 將 System.IsPinnedToNameSpaceTree 的值修改為「0」
5. 開啟檔案總管(或重新開機),發現OneDrive的連結圖示不見了。

Google File Stream Cache位置變更

Google File Stream不管在串流或是離線,都還是會用佔用主機的硬碟空間,
最好的方法是吧Google File Stream 快取移到較大的硬碟,而且現在C槽使用SSD的使用者越來越多,還是把寶貴的SSD拿來做更重要的事。
參考資料:https://support.google.com/a/answer/7644837?hl=zh-Hant

1. 關閉應用程式Google File Stream、
2. 至Google File Stream 預設快取路徑,把整個DriveFS資料來放到其他硬碟、
檔案總管路徑欄貼上 %LOCALAPPDATA%\Google\DriveFS
3. 使用系統管理員身份執行CMD,並輸入以下指令、
C:\>mklink /J "%LOCALAPPDATA%\Google\DriveFS" "E:\Google\DriveFS"
已建立 C:\Users\Ryan\AppData\Local\Google\DriveFS 的連接 <<===>> E:\DriveFS

Regular Expression – Email 驗證

之前用Limesurvey幫同事架的問卷系統,在現有的問卷碰到了 Email 格式驗證失敗的問題,
原來的RE無法判斷「xxx@a.b.c.d」的格式,
若是網域的組成超過3個,就會驗證失敗,
因為花了一點時間優化以前的RE,並把網域的組成加到4個。

測試網站:https://regex101.com/
原RE:^[_\.0-9a-z-]+@([0-9a-z][0-9a-z-]+\.)+[a-z]{2,3}$
新RE:^[_\.0-9a-z-]+@([_0-9a-z-]*\.)+[a-z]{2,4}$

查詢MAC AIR 資料夾大小

最近同事的MAC AIR速度超慢,看了一下硬碟大小,剩餘幾百MB,故使用指令找出是那些資料佔用了空間,讓同事自行決定是否刪除。
# du -sk -h /User/Ryan/*   //查詢Ryan路徑下所有子資料夾大小

ASUS Zenfone 4 Pro 來電漏接問題

原本以為是APP的問題,但移除掉相關的APP後,一樣會漏接電話,
結果是自已亂設定的結果,勾選了「封鎖未知號碼來電」,下場就是沒在通訊錄內的,一律直接轉進語音信箱!!

  1. 進入撥號程式,點選紅色箭頭的圖示。
  2. 點選「攔阻識別設定」
  3. 取消勾選「封鎖未知號碼來電」

Windows 7 安裝 AHCI 驅動程式

安裝 Windows 7 時,因為 BIOS 的 SATA設定值為AHCI,導致一進入安裝畫面就當機,
將 SATA設定值改為IDE 後,即可安裝作業系統,
但如果將 SATA設定值改回AHCI,就無法開機,
可使用以下步驟,安裝 AHCI 驅動程式。

  1. WIN鍵 + R,並輸入regedit。


  2. 在「登錄編輯程式」內找到「HKEY_LOCAL_MACHINE\SYSTEM\ CurrentControlSet\services\msahci」,並編輯「Start」,將DWORD值由3改為0


  3. 重新開機,並把BIOS 的 SATA設定值改為AHCI,Win7 會自動安裝驅動程式,若沒有自動安裝驅動程式,請開啟「裝置管理員」並手動安裝。

開啟使用者sudo權限

1) 進入超級使用模式。
[xxx@localhost ~]$ su -
Password:
Last login: Sat Mar 31 11:09:36 CST 2018 on pts/2
[root@localhost ~]#

2) 添加文件的寫權限。
[root@localhost ~]# chmod u+w /etc/sudoers

3) 編輯/etc/sudoers文件。找到這【root ALL=(ALL) ALL】,在下一行添加"xxx ALL=(ALL) ALL"(這裡的xxx是你的用戶名),然後存檔(wq)。
[root@localhost ~]# vim /etc/sudoers
root ALL=(ALL) ALL
xxx ALL=(ALL) ALL

4) 添撤銷文件的寫權限。 [root@localhost ~]# chmod u-w /etc/sudoers

如何製作 Win10(1709) 系統安裝USB隨身碟?(不是使用微軟工具)

使用微軟或rufus的工具,所製作的系統安裝隨身碟版本,無法通過學校的授權認證,
因此下載學校所提供的ISO,並依照下列步驟製作安裝隨身碟。
指令出處:How to create a bootable Windows 10 USB drive
1.Open a Command Prompt window. To do this, open Run (Windows key + R will do the trick; alternatively, it can be found in the Start menu), type "cmd" and then press the OK button.
2.Use the "diskpart" command to open the disk partitioning software. Accept the UAC prompt, if asked, to continue.
3.Use the "list disk" command to display the list of storage drives -- it will reveal all the HDDs, SSDs, USB drives, and so on, that are attached to your PC.
4.Identify the disk number of the USB drive that you are using -- you can easily find it by looking at the size column; it is usually the last one that is listed.
5.Use the "select disk X" command to select the USB drive -- "X" is the disk number of your USB drive, and it is shown in the first column.
6.Use the "clean" command to erase everything on the USB drive.
7.Use the "create partition primary" command to create a primary partition on the USB drive.
8.Use the "select partition 1" command to select that partition.
9.Use the "active" command to make said partition active.
10.Use the "format fs=fat32 quick" command to format it as FAT32, using the Quick (fast) routine.
11.Use the "assign" command to assign a drive letter to the USB drive -- it will show up as a drive under My Computer.
12.Copy the extracted contents of the Windows 10 ISO to the USB drive.

Fail2Ban & iptables & SELinux 三角習題

yum安裝及設定Fail2Ban後(來源epel),
可以看到相關的統計數據(fail2ban-client status ssh-iptables),
也會email通知目前有人在try帳密,但就是不會鎖IP
而且在iptables也看不到由Fail2Ban所加入的chain。

查看fail2ban.log看到以下的錯誤訊息。
# rpm -q fail2ban
 fail2ban-0.8.14-2.el6.noarch

# uname -r
 2.6.32-504.23.4.el6.i686

# cat /var/log/fail2ban.log
 2015-07-01 13:21:07,299 fail2ban.actions.action[32420]: ERROR iptables -n -L INPUT | grep -q 'fail2ban-SSH[ \t]' returned 100
 2015-07-01 13:21:07,299 fail2ban.actions.action[32420]: CRITICAL Unable to restore environment
 2015-07-01 14:53:19,471 fail2ban.server [32420]: INFO Stopping all jails
 2015-07-01 14:53:20,158 fail2ban.actions.action[32420]: ERROR iptables -D INPUT -p tcp --dport ssh -j fail2ban-SSH
 iptables -F fail2ban-SSH
 iptables -X fail2ban-SSH returned 300
 2015-07-01 14:53:20,243 fail2ban.jail [32420]: INFO Jail 'ssh-iptables' stopped
 2015-07-01 14:53:20,245 fail2ban.server [32420]: INFO Exiting Fail2ban

將SELinux改為Permissive 模式後 Fail2ban 就正常工作了(可以看到ssh-iptalbes的chain)
查看SElinux Alert看到以下的訊息
SELinux Is Preventing /sbin/iptables-multi-1.4.7 From Read Access On The File/rawip_socket
接下來查看iptables-multi-1.4.7的selinux context,應該為system_u:object_r:iptables_exec_t:s0。 # ls -lZ /sbin/iptables-multi-1.4.7
 -rwxr-xr-x. root root system_u:object_r:bin_t:s0 /sbin/iptables-multi-1.4.7

修正selinux context
# restorecon -R -v /sbin/
 restorecon reset /sbin/iptables-multi-1.4.7 context system_u:object_r:bin_t:s0
->system_u:object_r:iptables_exec_t:s0

# service fail2ban restart

成功囉!!!!

MySql故障後,先不要急著重新安裝!!!

今天早上單位的官網突然壞了,
網頁的訊息是找不到資料庫內所放的參數,
但明明昨天還好好的,
原來是硬碟的空間滿了(網站備份檔塞爆了 /var 100%),
還好沒有重新安裝。

# df -h

移除新版 Google Chrome 書籤

升級至 chrome 42.x.x 後,新版書籤真的是有夠難用,以下方法就是換回舊版書籤介面。

在網址列輸入 chrome://flags
找到 啟用強化書籤 並選擇 已停用,重新啟動瀏覽器後,就完成囉。

設定網頁超連結顔色

當CSS語法固定超連結顔色後,想使用別的顏色,可以使用以下語法設定。

<a href="http://www.ntu.edu.tw" style="color: red;">台大首面</a>

phpList + 合併列印 + 附加檔案

我把phpList 當作發信軟體在使用,發現以往 word 做不到的事,用 phpList 都可以做到了,也就合併列印寄送Email時,可以附加檔案。

第一步:登入後工具列的 System ➜ CONFIGURE ATTRIBUTES 增加 3 個欄位後 save changes,而原本已存在的使用者也會有這些欄位。
1. Name:公司名稱;Type:textline
2. Name:攤位數;Type:textline
3. Name:金額;Type:textline


第二步:在 Excel 新增相關內容,請記得存成CSV格式。


第三步:選擇工具列的 Subscribers ➜ IMPORT EMAILS ➜ import by uploading a CSV file with emails and additional data。


第四步:新增一個訂閱群組(list):合併列印DEMO。


第五步:選擇上傳CSV檔並設定逗號為欄位分隔字元後,點擊在頁尾的Import Buttom。


第六步:指定相對應的欄位。因為中文匯入會是亂碼,所以以後還是儘量使用英文名稱(第一步),就不會出現這個步驟。


第七步:確認匯入內容無誤後,點選Confirm Import 完成匯入作業。


第八步:查看A公司基本資料,在金額部份因為有逗號(欄位分隔字元),所以後面3個0會被截掉。


第九步:開始一個新的電子報建立新的電子報,在content tag新增下以內容,中括號內為個人基本資料的[欄位名稱]。


在attach tag新增附件檔案

第十步:選擇訂閱群組。在Finish Tag發送後,信件內容就會帶出相對的公司資料


信件內容:

phpList相關設定說明

問題1:遇到登出、儲存設定、編輯新的電子報等操作時,若安裝 phpList 時,預設路徑不是在 DocumentRoot,就要修改phpList 的 pageroot 設定值。(只修改config.php或config_extended.php是沒有用的)
解答:修改 init.php 檔(/var/www/html/mailer/lists/admin/init.php)。
   372 if (!isset($pageroot)) {
   373 $pageroot = '/lists';
   374 $GLOBALS['pageroot'] = '/mailer/lists';


問題2:在編輯電子報時,沒有出現 Attach Tab。

解答:修改 init.php及config_extended.php檔。
init.php 路徑:/var/www/html/mailer/lists/admin/init.php
config_extended.php 路徑:/var/www/html/mailer/lists/config/config_extended.php

init.php:
168 if (!defined("ALLOW_ATTACHMENTS")) define("ALLOW_ATTACHMENTS",1);
config_extended.php:
625 define('ALLOW_ATTACHMENTS',1);
631 define("FILESYSTEM_ATTACHMENTS",1);


問題3:設定上傳圖片目錄(/var/www/html/mailer/uploadimages)權限。
解答:設定權限為776,user 及 group 可讀可寫可執行,other users 僅可讀寫。
# chmod 776 uploadimages/

問題4:移除電子報的logo。
解答:註解以下的程式。
# vim /var/www/html/mailer/lists/admin/sendemaillib.php
233 /*
234 if (!EMAILTEXTCREDITS) {
235 $html["signature"] = $PoweredByImage;
237 $html["signature"] = preg_replace('/src=".*power-phplist.png"/','src="powerphplist.png"',$html["signature"]);
238 } else {
239 $html["signature"] = $PoweredByText;
240 }
241 */


問題5:ProcessQueue 一直處在 submmited 或 Waiting 狀態,還要手動去按 Process the queue 才有動作,而且不管改config.php、config_extension.php或是改程式碼,手動執行完一次後,就會又一直處在 Waiting 狀態。
解答:改用Command Line來執行,並透過排程定期執行。
# crontab -e
*/20 * * * * /usr/bin/php /var/www/html/mailer/lists/admin/index.php -pprocessqueue -c /var/www/html/mailer/lists/config/config.php > /dev/null


問題6:移除在 Email 中的 Track Code,如果 phpList 是安裝在加密目錄下(htaccess),收件者要查看完整內容就會跳出詢問帳密的視窗,因為在HTML格式多了下面這行 Code。
它將使用者代碼以 HTML img TAG 方式傳遞參數至 ut.php 檔(如果理解有誤請高手指教),而 ut.php 檔在加密目錄下,所以才會跳出詢問帳密的視窗。
<img src="http://www.demo.com/mailer/lists/ut.php?u=*****************&amp;m=33" width="1" height="1" border="0" alt=""> 解答:更改 ALWAYS_ADD_USERTRACK 參數值。
# grep -r -i "ALWAYS_ADD_USERTRACK" . //有3個檔案都有這個參數。
 ./config/config_extended.php: define('ALWAYS_ADD_USERTRACK',0); //原始設定是被註解,但開了也沒用,所以不用考慮。
 ./admin/sendemaillib.php: if (ALWAYS_ADD_USERTRACK) {
 ./admin/init.php:if (!defined('ALWAYS_ADD_USERTRACK')) define('ALWAYS_ADD_USERTRACK',1); //改這裡的設定才有用。

# vim init.php
  if (!defined('ALWAYS_ADD_USERTRACK')) define('ALWAYS_ADD_USERTRACK',0);

phpList語系選單只保留英文及繁體中文的選項

只保留英文及繁體中文的選項要在哪裡設定?
  1. 路徑1:/var/www/html/lists/admin/locale
    只保留en及zh_TW的目錄,其他的目錄都刪除,
    並修改目錄中的language_info檔案內容。 #pwd
      /var/www/html/lists/admin/locale/en
    #vim language_info
      name=ENGLISH
      charset=UTF-8

    #pwd
      /var/www/html/lists/admin/locale/zh_TW
    #vim language_info
      name=繁體中文
      charset=UTF-8

  2. 路徑2:/var/www/html/lists/admin/language.php
  3. 只保留en及zh_TW的設定。 ## this array is now automatically build from the file system using the
    ## language_info file in each subdirectory of /locale/
    ## and further on, from the XML data of the translation site
    $LANGUAGES = array(
    "en" => array("english ","UTF-8","UTF-8, windows-1252 "),
    "zh_TW" => array("Traditional Chinese","utf-8","utf-8"),
    );

修改前


修改後


注意事項

下拉式選單中的項目名稱,修改的優先權是 language_info 大於 language.php,也就是說把 language.php 中的 Traditional Chinese 改成繁體中文是沒有效果的,除非該語系的 language.php 不存在。

改變 phpList 預設語言 (Default Language)

方法一

此方法的缺點:無法再切換其他輸入法。
設定檔路徑:/var/www/html/lists/admin/languages.php
在程式碼@session_start();底下加入$_POST['setlanguage'] = 'zh_TW';

if (!empty($GLOBALS["SessionTableName"])) {
require_once dirname(__FILE__).'/sessionlib.php';
}
@session_start();

$_POST['setlanguage'] = 'zh_TW'; // 加入這行程式碼

if (isset($_POST['setlanguage']) && !empty($_POST['setlanguage']) && is_array($LANGUAGES[$_POST['setlanguage']])) {
## just in case
$setlanguage = preg_replace('/[^\w_-]+/','',$_POST['setlanguage']);
$_SESSION['adminlanguage'] = array(
"info" => $setlanguage,
"iso" => $setlanguage,
"charset" => $LANGUAGES[$setlanguage][1],
"dir" => $LANGUAGES[$setlanguage][4],
);
# var_dump($_SESSION['adminlanguage'] );
}
參考資料:http://selainsoft.blogspot.tw/2008/05/phplist-default-language.html


方法二

優點:改善方法一的缺點。
設定檔路徑:/var/www/html/lists/admin/index.php
在開頭加入以下的程式碼: //設定管理者介面預設語言為繁體中文
$deflanguage;
session_start();

if( !isset( $_SESSION['deflanguage'] )){
$_SESSION['deflanguage'] = 1;
$_POST['setlanguage']="zh_TW";
}

VMware-Virtual Network Editor(vmnetcfg.exe)適用 VMware-player-full-7.0.0-2305329 版本(2018/1/3更新)

在VMware-player-full-14.1.0的版本下使用vmnetcfg.exe,vmnetcfg.exe的版本就要從VMware-workstation-14.1.0內提取出來,最簡單的方式就是使用解壓縮軟體(7-Zip、WinRAR...)。
使用7-zip開啟workstation.exe安裝檔,再開啟Workstation.cab,就可以找到vmnetcfg.exe檔案。

==========================================================================================
Virtual Network Editor 是可以設定 VMware Player 網段和網路型態的工具,
但後來比較新的版本都沒有這個工具。

目前可以知道的是在 VMware Workstation 內是附有這個小工具的,
因此解決方案的方法就是下載用指令解壓縮或安裝 VMware Workstation,從裡面把這個小工具拿出來。

據網路上的文章描述,適用 VMware-player-full-7.0.0-2305329 的 Virtual Network Editor,
是 VMware-workstation-11.0.0 以上的版本,
而由於解壓縮時並沒有 core.cab 的檔案(舊文:VMware-自訂網段工具(vmnetcfg.exe)),
因此必需安裝 VMware-workstation 後再到 VMware Workstation 目錄內把 vmnetcfg.exe 複製到 VMware Player 目錄內,就可以指定網段的範圍了。

使用 Regular Expressions 提取 Excel 儲存格內容為Email的字串(In-Cell Function)

因為電子報有近2千封的退信,在Outlook 2013 一封一封的開啟並複製 email address 是非常耗時的,因此才想到用 VBA 來完成這樣的工作。

這個流程分2部份,第1部份是從 Outlook 2013 匯出 CSV 格式的記錄檔,第2部份是在 Excel 中寫入功能模組。

第1部份:從 Outlook 2013 匯出 CSV 格式的記錄檔

  1. 開啟匯入及匯出精靈並選擇『匯出至檔案』

  2. 選擇『逗點分隔值』

  3. 先將退信集中在一個資料夾,再匯出 CSV 檔

  4. 指定儲存路徑及檔名

  5. 只輸出郵件本文到 CSV檔

第2部份:在Excel中寫入功能模組

  1. 點選 Visual Basic

  2. 新增模組

  3. 增加 RE 引用項目:工具 ➠ 設定引用項目 ➠ Microsoft VBScript Regular Expression 5.5 打勾

  4. 在模組下增加以下的程式碼
  5. Function RegExGet(aString As String) As Variant
     Dim regEx As New RegExp
     Dim newArray() As String
     Dim x As Integer
     Dim y As Integer

     regEx.Pattern = "[a-zA-Z0-9_]+@[a-zA-Z0-9\._]+" // 電子郵件的Regular Expressions
     regEx.IgnoreCase = True
     regEx.Global = True
     Set matches = regEx.Execute(aString)
     x = matches.Count

     ReDim newArray(x - 1) As String
     Count = 0

     For Each Match In matches
        newArray(cnt) = Match.Value
        cnt = cnt + 1
     Next

     RegExGet = newArray()

    End Function
    程式碼出處:UDF8: RegExGet - return matches of regular expressions in excel (excel VBA)

  6. A欄是電子郵件本文,B欄則是我們要的資料,例如在B2欄中輸入=RegExGet(A2),就可以篩選出email address

Clonezilla 再生龍還原 Win8(64位元)

Clonezilla 再生龍前篇:Clonezilla 再生龍備份 Win8(64位元)
使用Windows光碟片開機,刪除Win8的系統分割區(100MB),準備進行還原測試。
  1. Win8的系統分割區(100MB)後,Win8開啟失敗。

  2. 掛載再生龍ISO映像檔並使用光碟機開機,前半部基本設定請參閱Clonezilla 再生龍備份 Win8(64位元)的步驟5至步驟14。

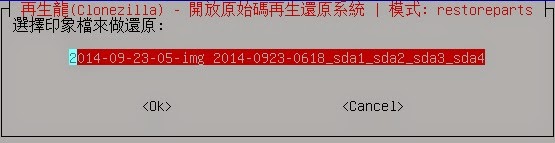
  3. 選擇「還原印象檔到本機分割區」

  4. 選擇還原來源

  5. 選擇還原系統分割區

  6. Clonezilla會產生一個快捷指令,下次如果要進行相同的工作,輸入這個快捷指令就可以再次執行同樣的工作。

  7. 輸入「y」後按「Enter」鍵,開始執行還原動作。

  8. 還原成功

  9. 重新開機,Win8成功還原